Assembly Instructions
Arctic Dome
1. The unique framework construction is easily assembled by two or three people in under an hour. Using a crane of lift will simplify construction even further.
It’s important to follow the assembly guidelines, so please read it carefully before starting.
Overview of included parts
The frame is built with four types of main elements. See fig. 1.
| No. | Element |
|---|---|
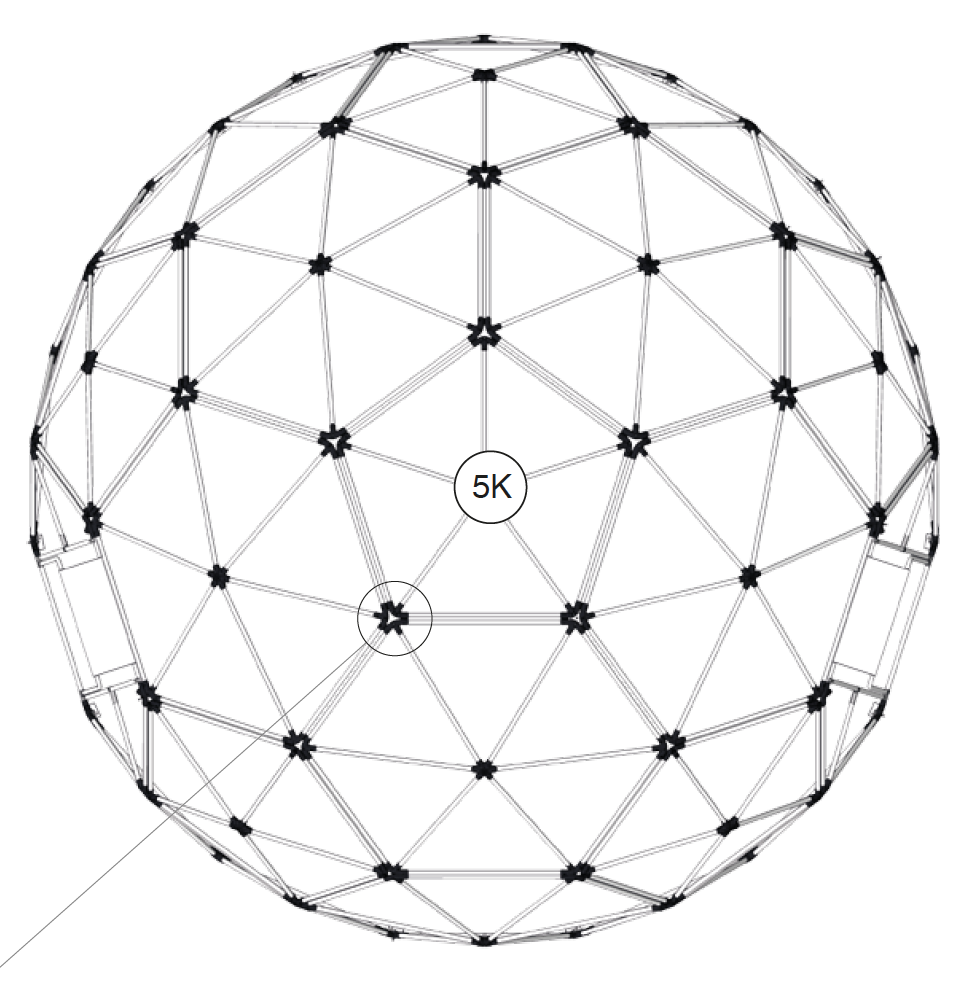
| 6 | Element 5K (5-sided framework part) |
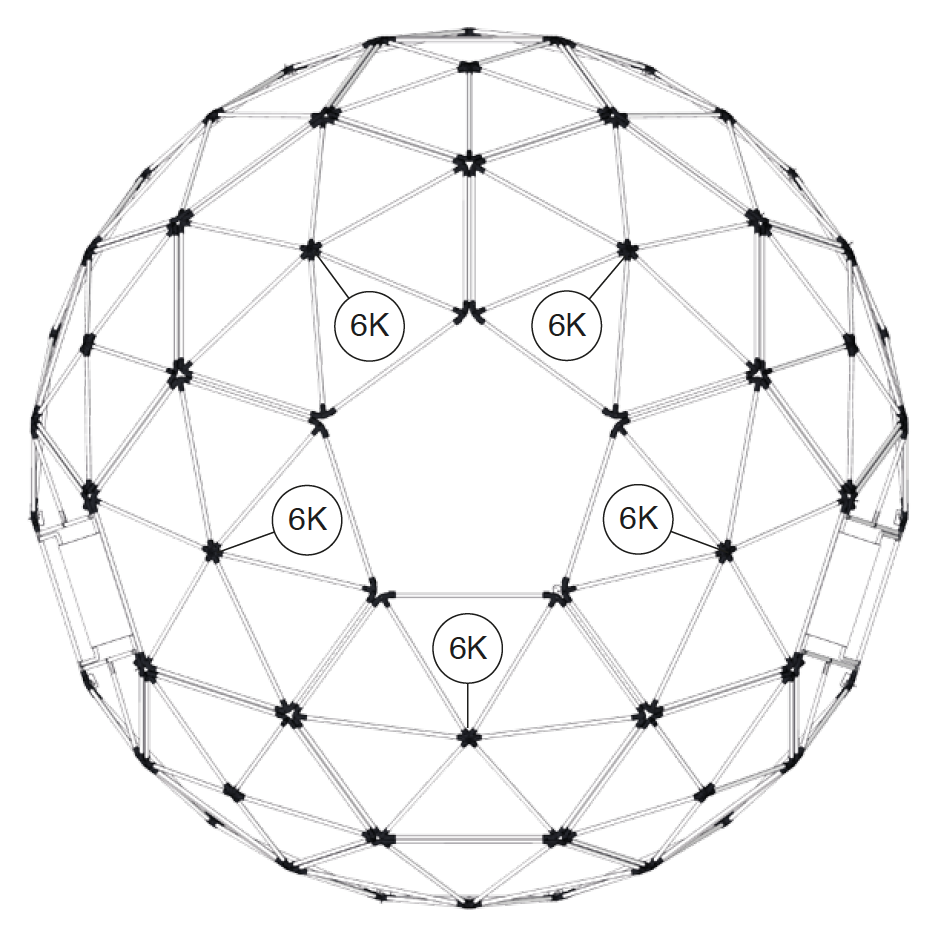
| 8 | Element 6K (6-sided framework part) |
| 5 | Element 6 KH (half 6-edge) |
| 2 | Element 6KD (6-sided with door opening) |
Before assembly, please check all parts for damage or flaws. Connections are done with the supplied coupling plates and screws, along with special nuts. See some way further down the page.
Fig. 1

Element 5K
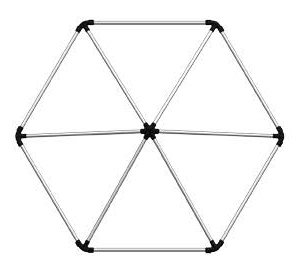
Element 6K

Element 6KD
Element 6KH
2. Make sure all parts have been included in the set, and do not have transport damage or other potential causes for issues during assembly.
Overview of included parts
Kit contains:
| Antall | Element |
|---|---|
| 1 | Complete outer layer with windows and doors (fig.2) |
| 1 | Inner layer with curtain and skylight (fig.3) |
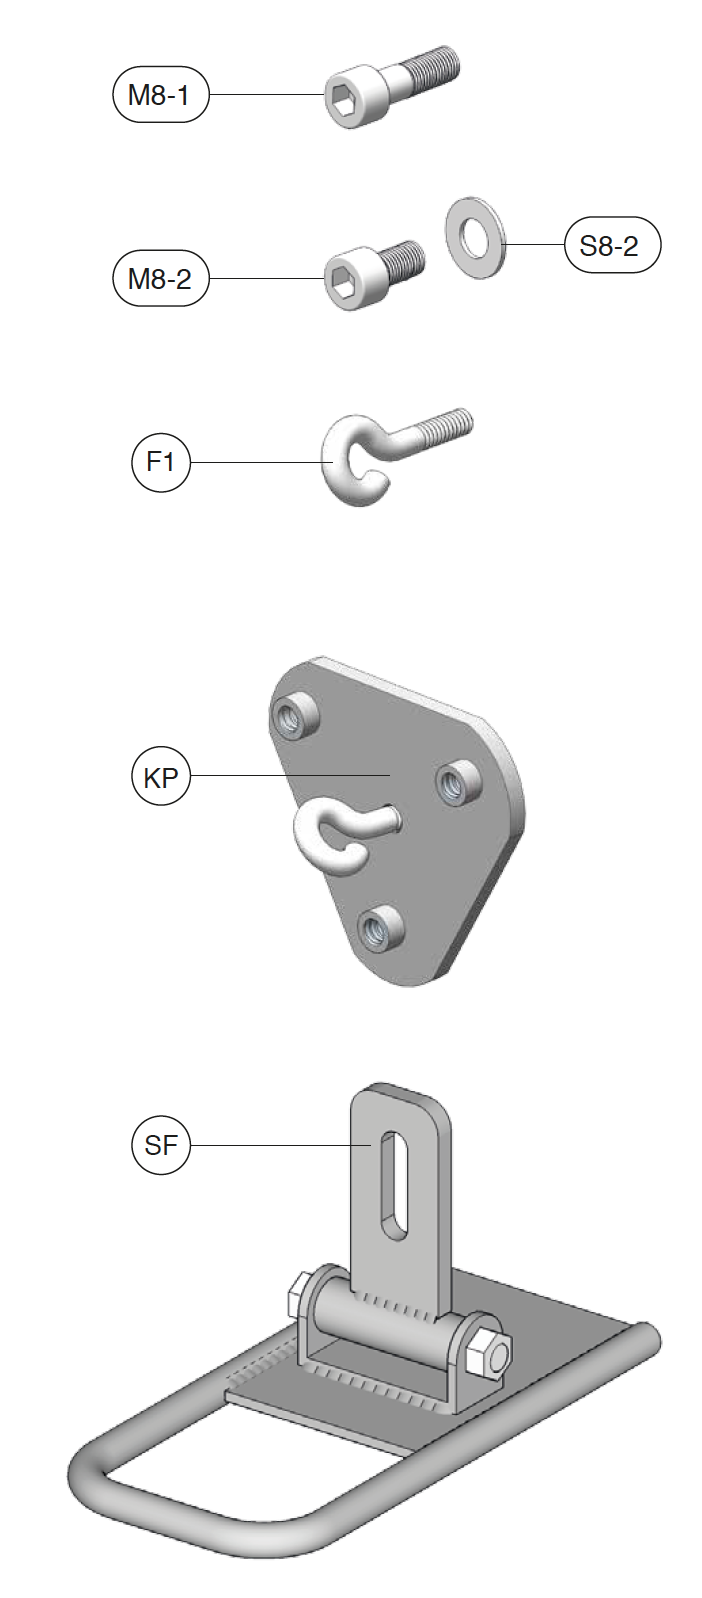
| 117 | Fixing screws M8x30 (M8-1) |
| 10 | Fixing screws M8x20 (M8-2) |
| 10 | Washer M8 (S8-2) |
| 14 | Hook for inner layer (F1) |
| 40 | Coupling plate (KP) |
| 10 | Support base for frame (SF) (fig.4) |
Fig. 2
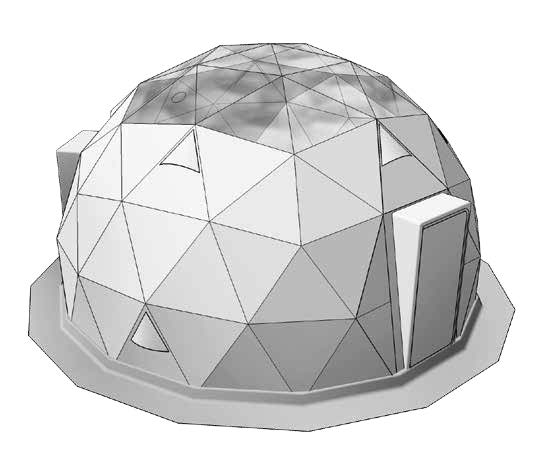
Fig. 3
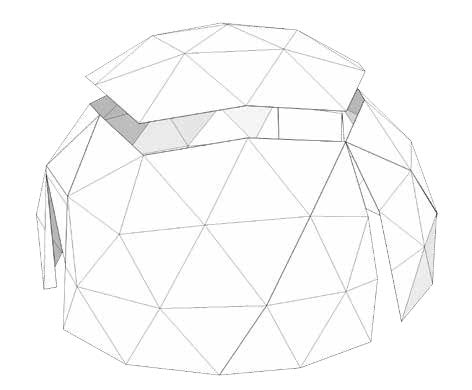
Fig. 4
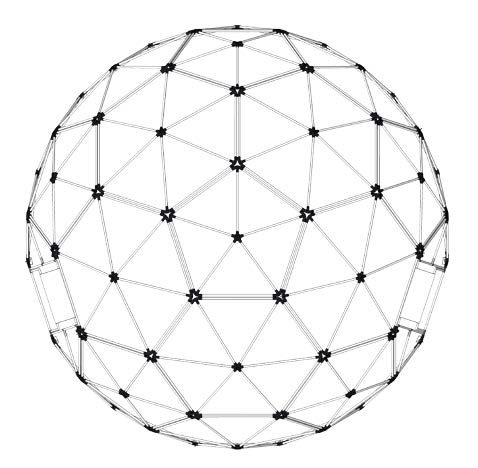
3. Assembly in general
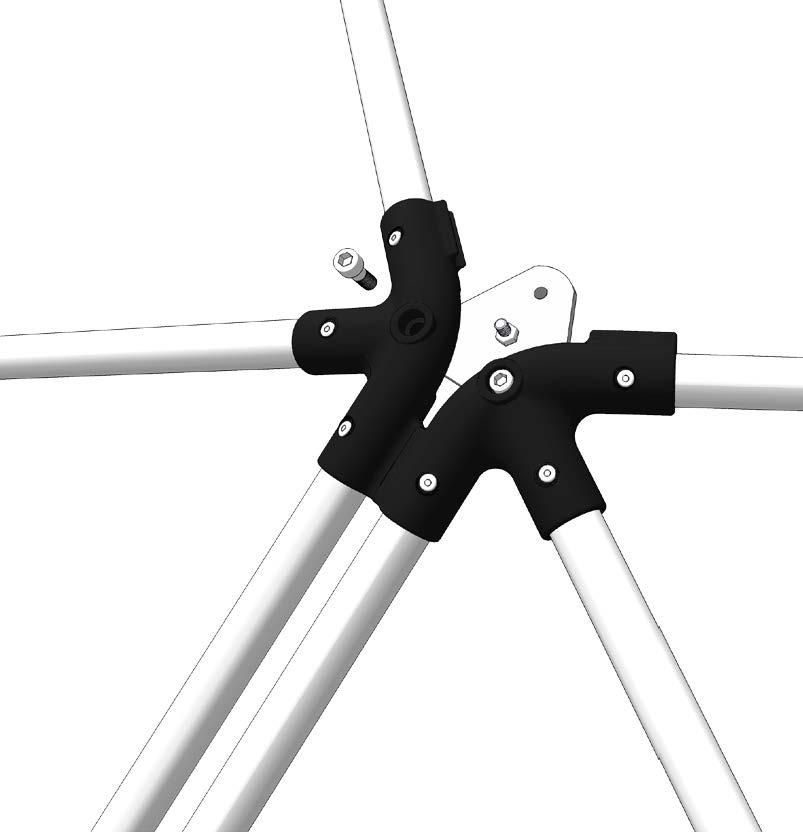
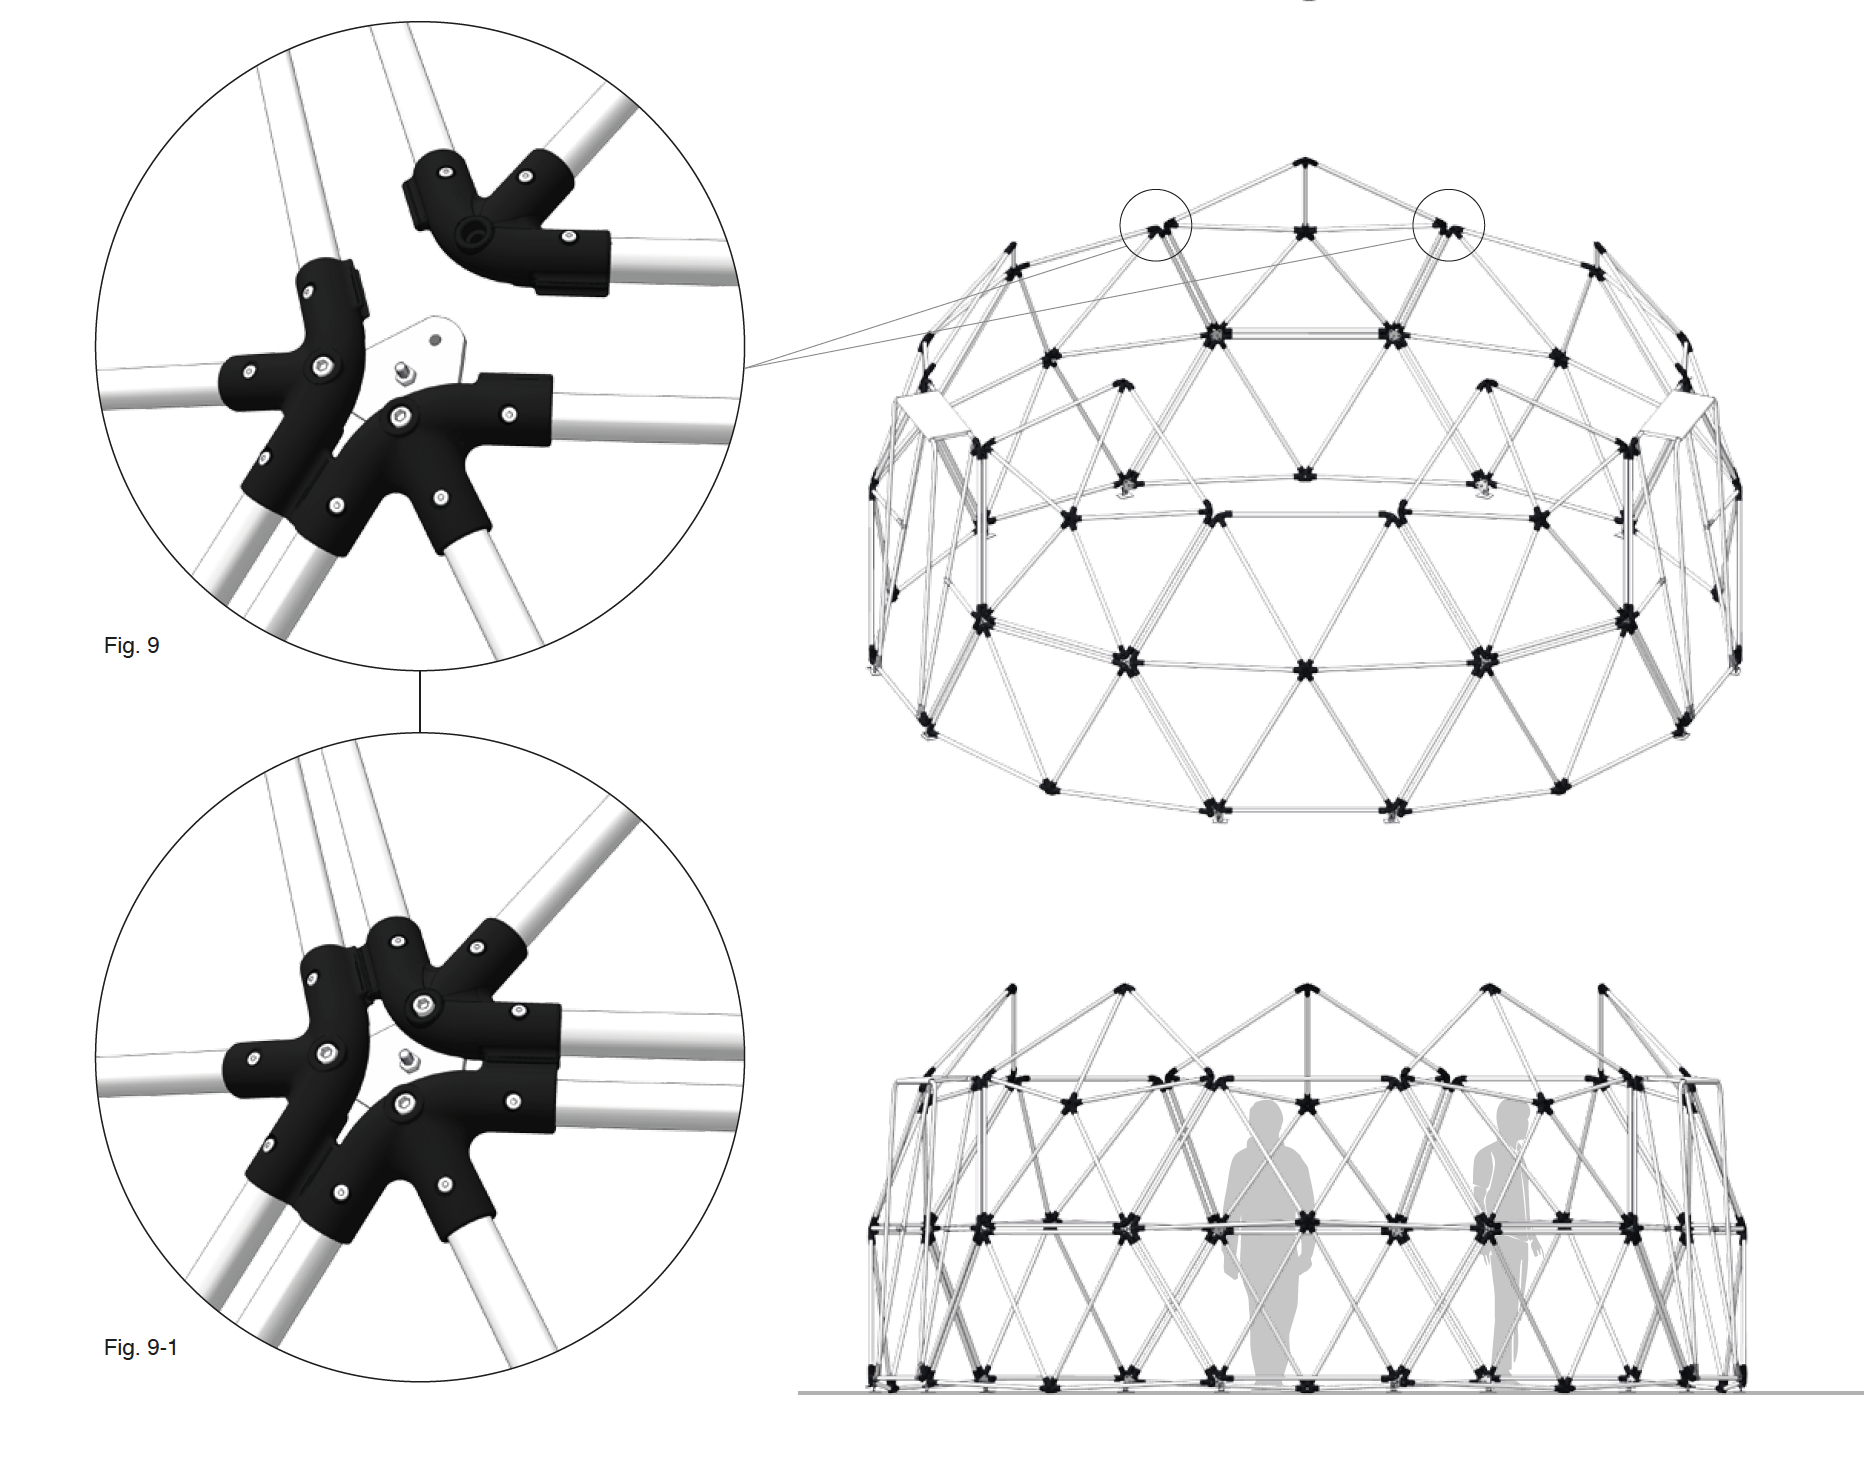
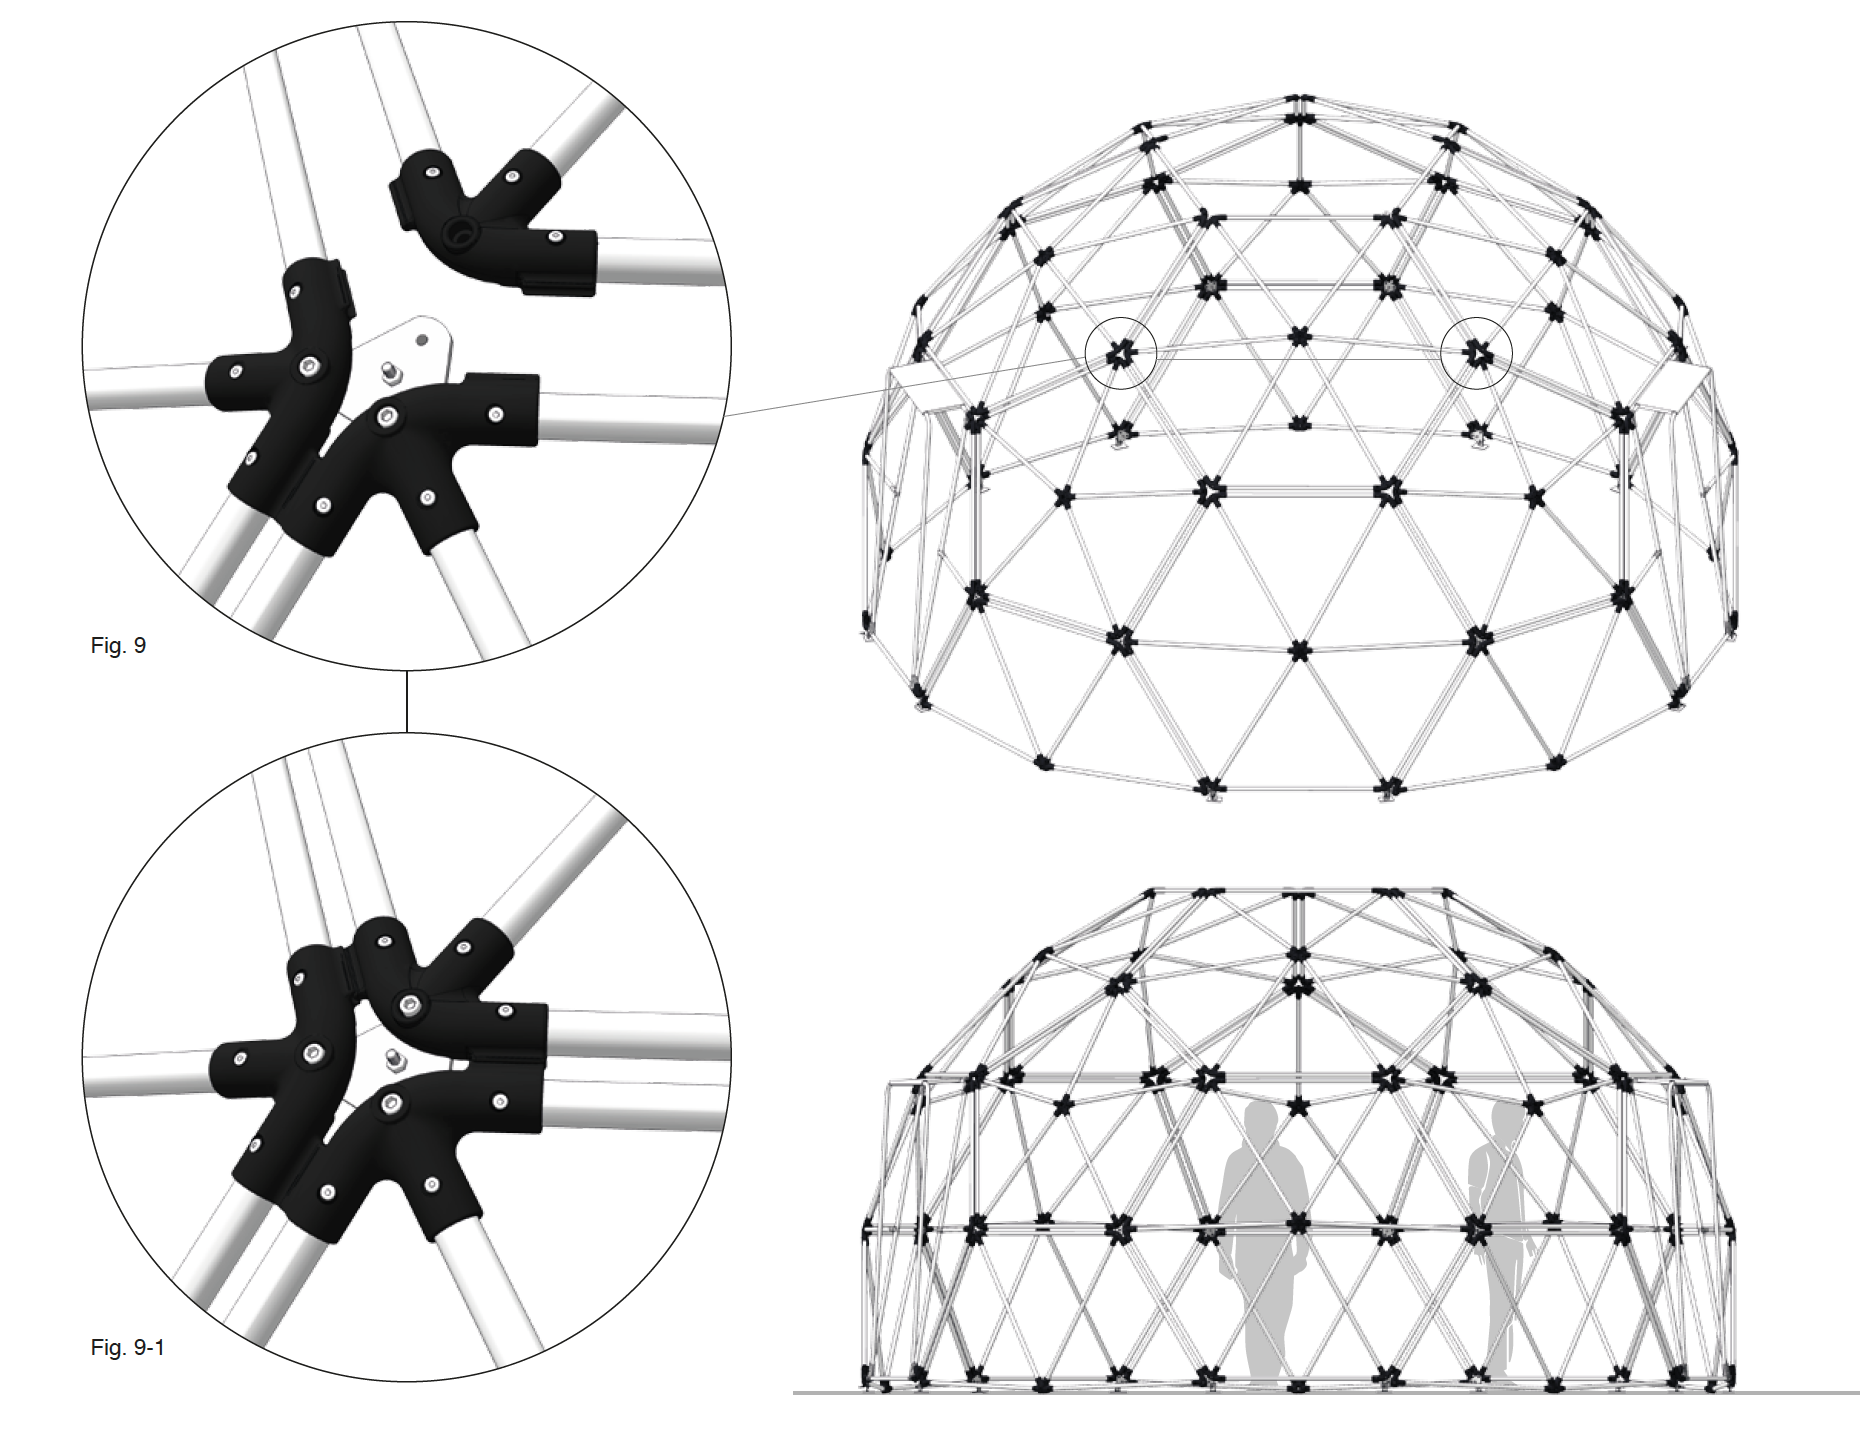
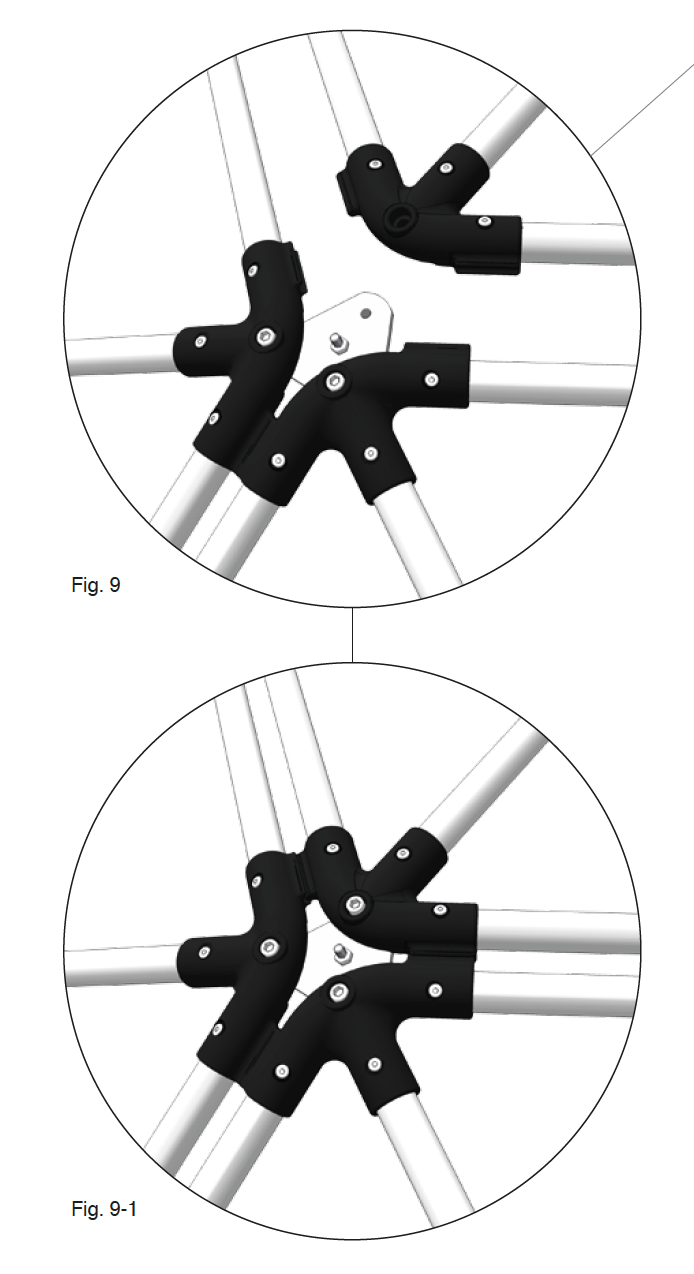
All the framework elements (5K), (6K), (6KD) and (6KH) must be connected with a coupling plate (KP) at each corner. See figure 5.
All corners of the frame have keyways (NF) with a “male” and a “female” side that fits together. The coupling plate (KP) is used in all corners. After the framework parts (5K), (6K), (6KD), (6KH) are connected, make sure that the keyways (NF) are correctly connected.
Insert a coupling plate (KP) in the two adjacent corners. Make sure that the straight/flat side of the coupling plate is facing the plastic parts. See figure 5 & 6.
Then insert 2 pcs (M8-1) and finger tighten screws. Do not tighten the screws until the whole frame is complete.
This assembly is the same for all frame elements.
Fig. 5
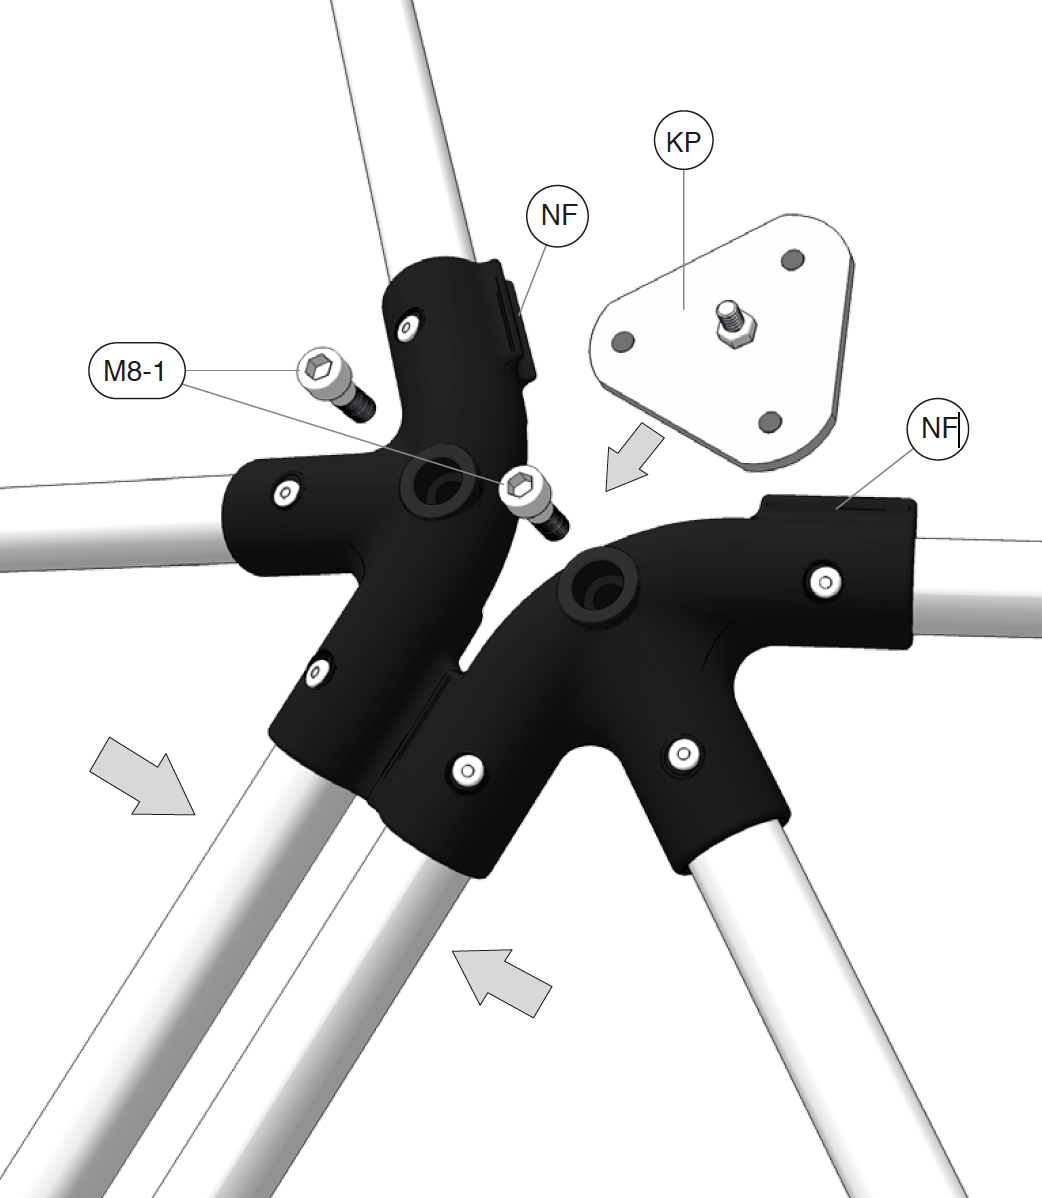
Fig. 6
4. Assembly in general
Mount the support base (SF) at the bottom of all framework corners (6KH).
This support base assists and evens the framework.
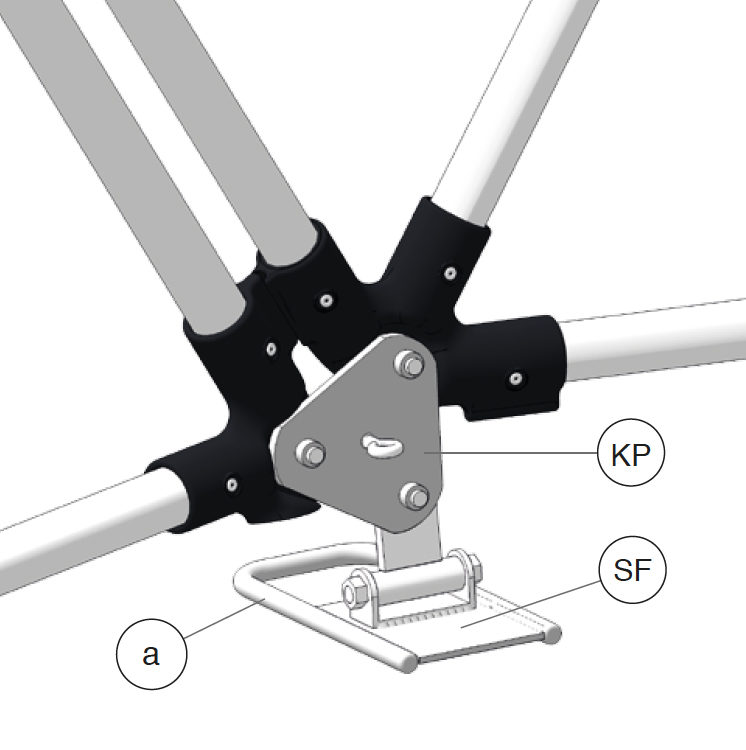
After assembly of the coupling plate (KP) as shown on the previous page, mount the support base (SF) on the coupling plate facing downwards, or groundward.
The support base (SF) is mounted with 1 screw (M8-2) with washer (S8-2).
Make sure that the open part (a) of the support base (SF) is facing outwards from the tent, see figure 8.
This assembly of all 10 support bases (SF) is the same for all framework elements (6KH).
Fig. 7
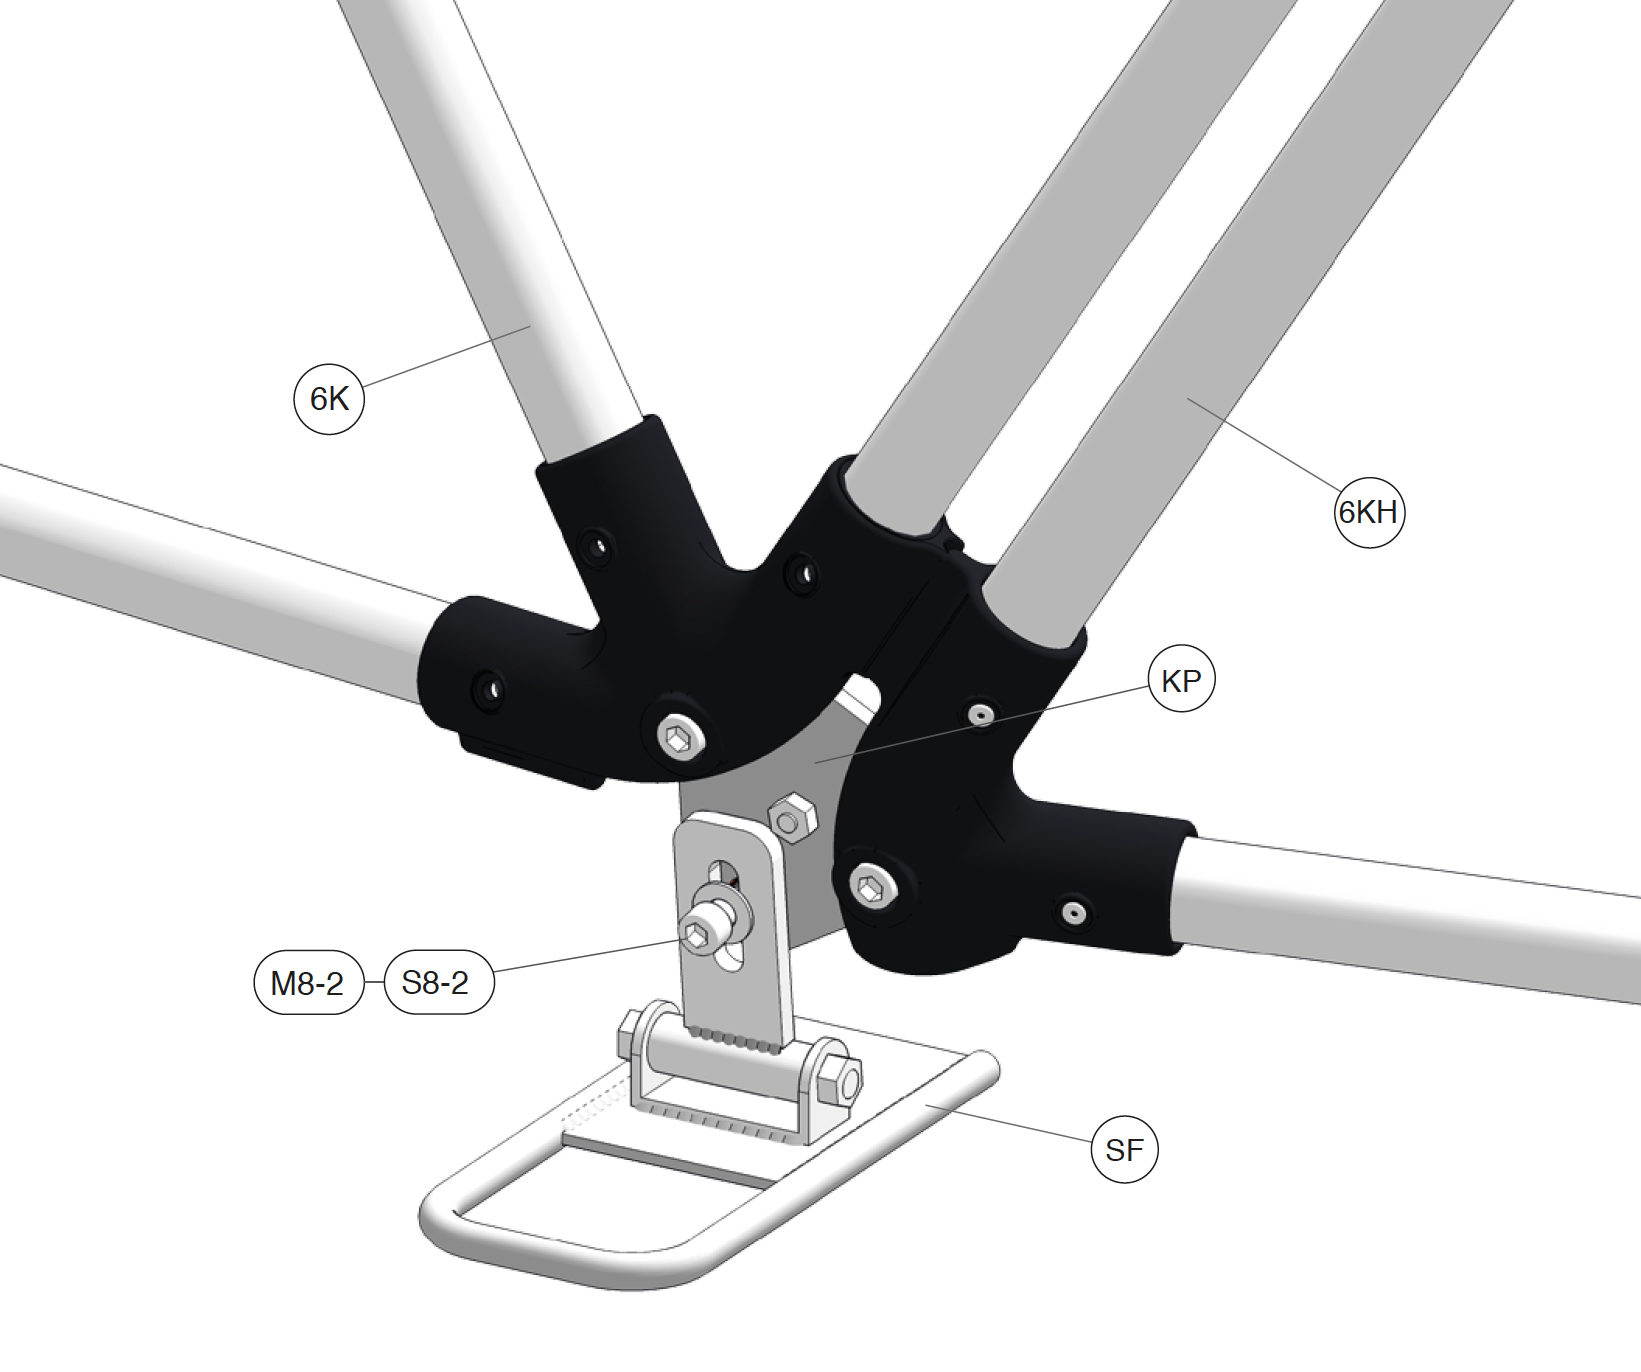
Fig. 8
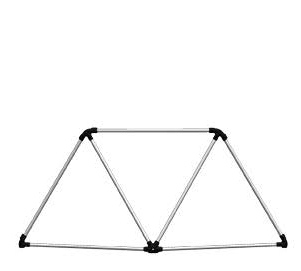
5. Mounting framework parts (part 1 of 5)
Start the assembly with 1 element (6KD) and 2 (6KH).
Place the elements as shown in the drawings on this page.
Connect the framework parts with coupling plates (KP) and screws (M8-1).
Then mount the support base (SF) at the bottom.
Do not tighten the screws before the whole frame is assembled.
See page 3 and 4 for more detailed instructions for assembly of the coupling plates (KP) and support base (SF).
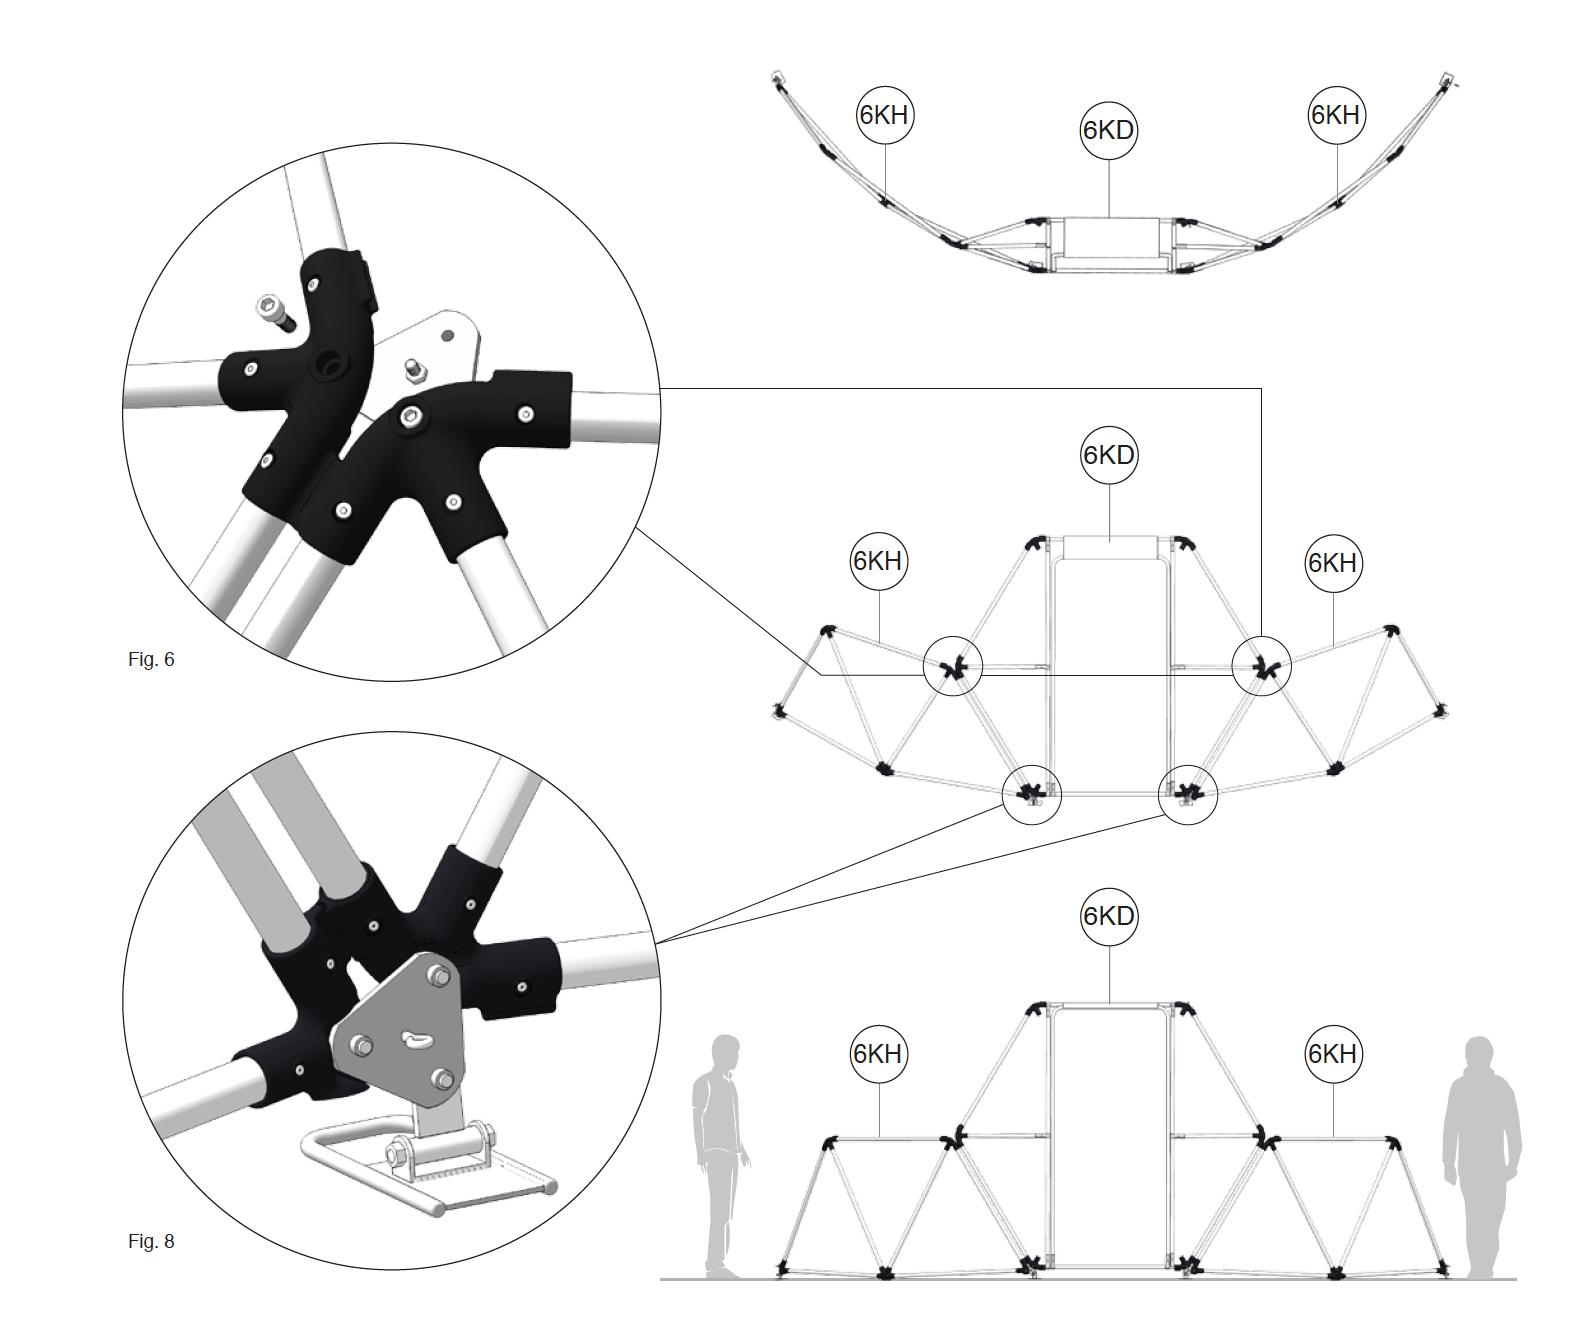
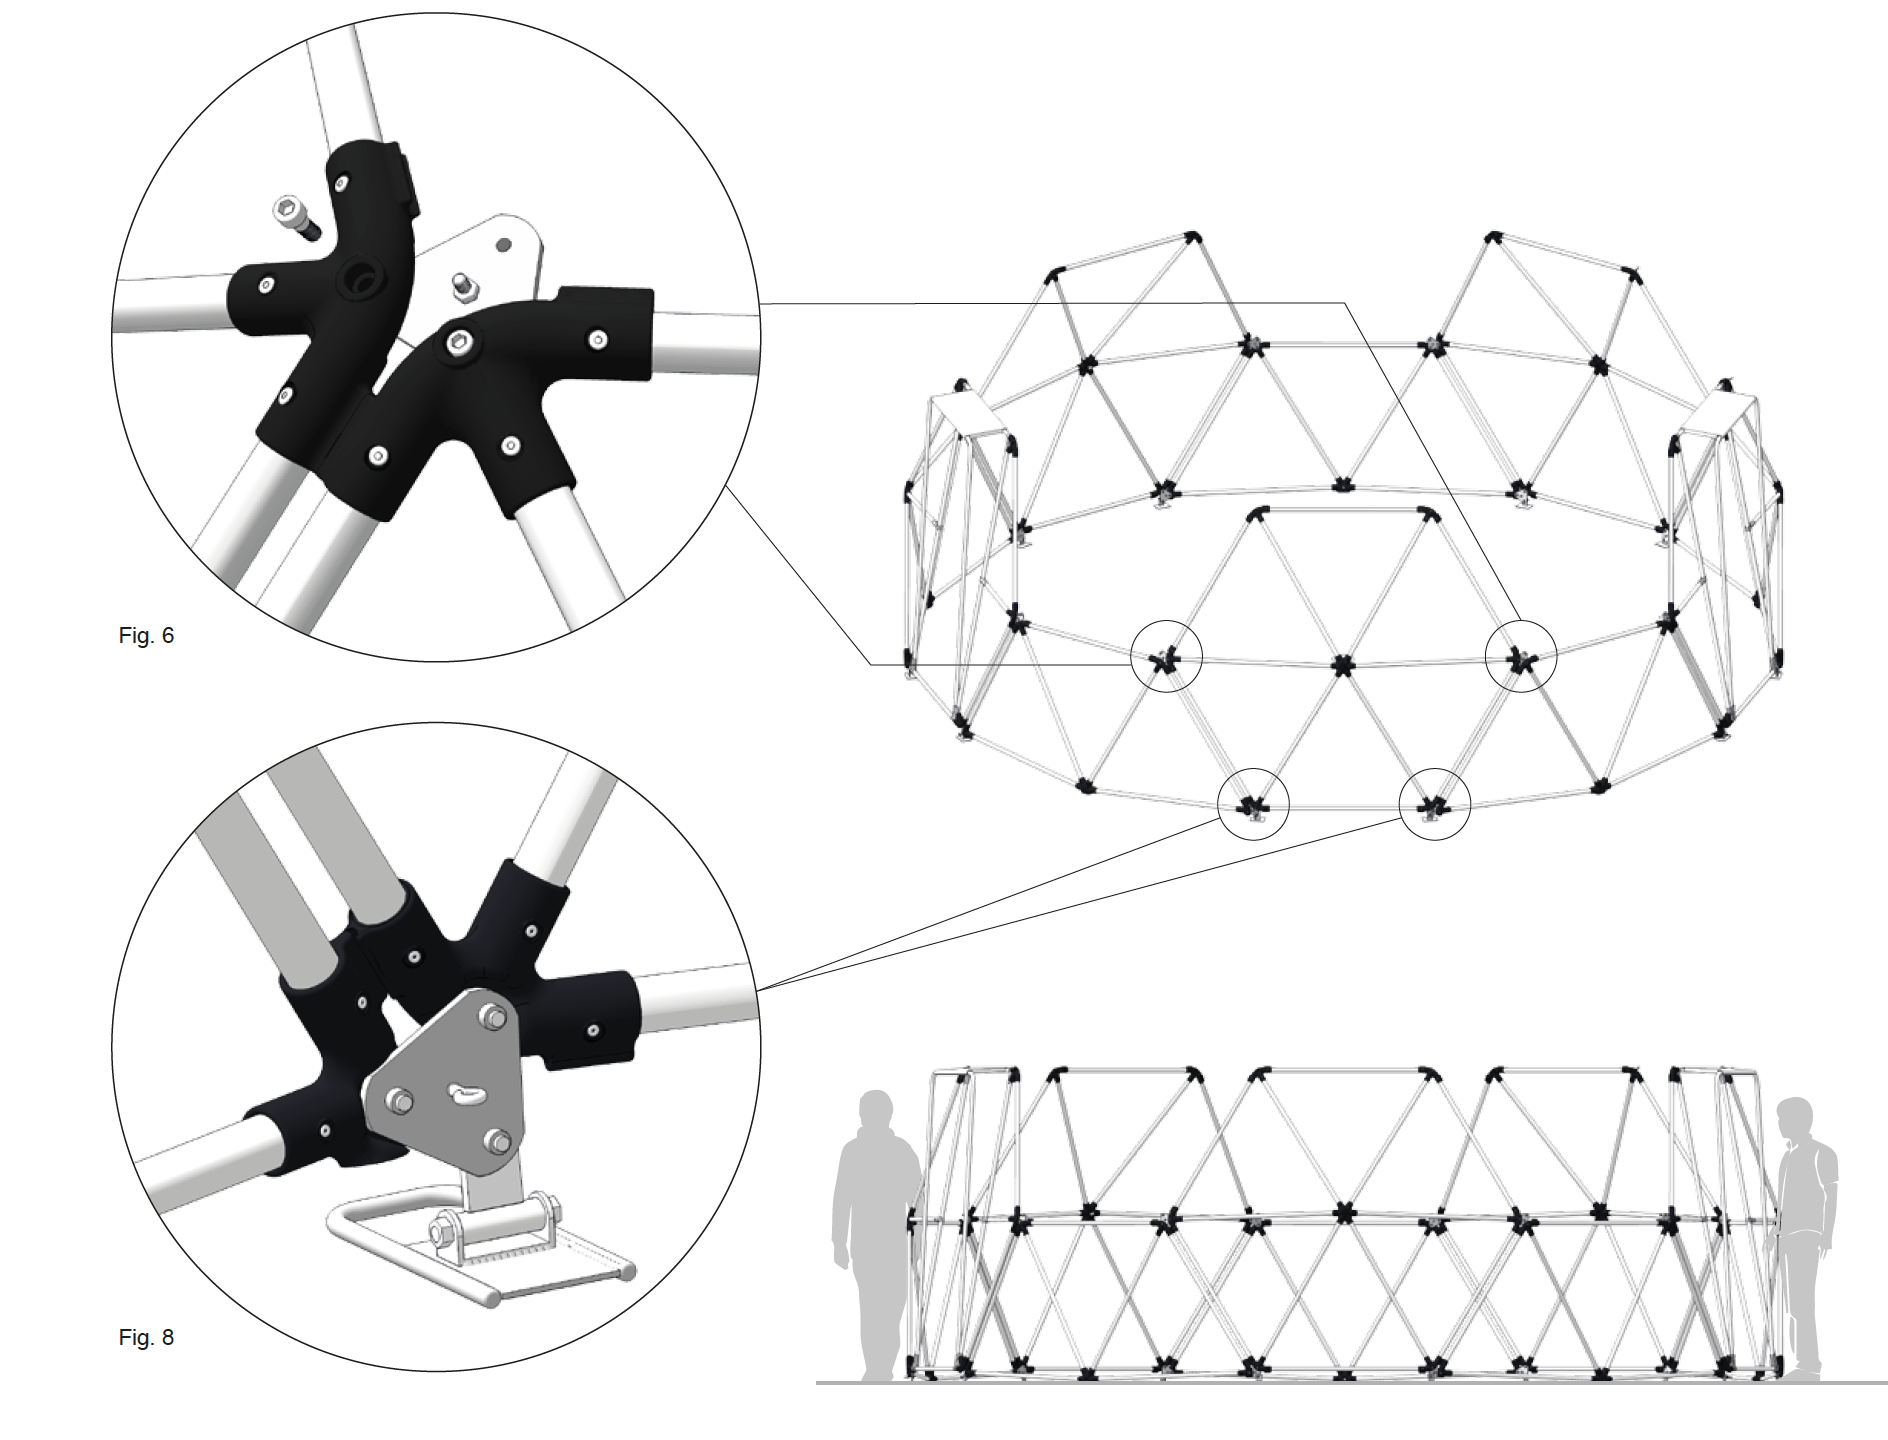
5. Mounting framework parts (part 2 of 5)
Then mount 3 six sided elements (6K) 1 door element (6KD) and 3 half six sided elements (6KH).
Start with one six-sided element (6K) to build on from the previous page. Then use one half six-sided element (6KH) and then a door element (6KD).
Keep going with half six-sided elements, and six sided elements, until the ring is complete. Mount the support base (SF) on all half 6-gons.
See drawings and overview of elements on this page.
Do not tighten the screws before the whole frame is assembled.
See page 3 and 4 for more detailed instructions for assembly of the coupling plates (KP) and support base (SF).
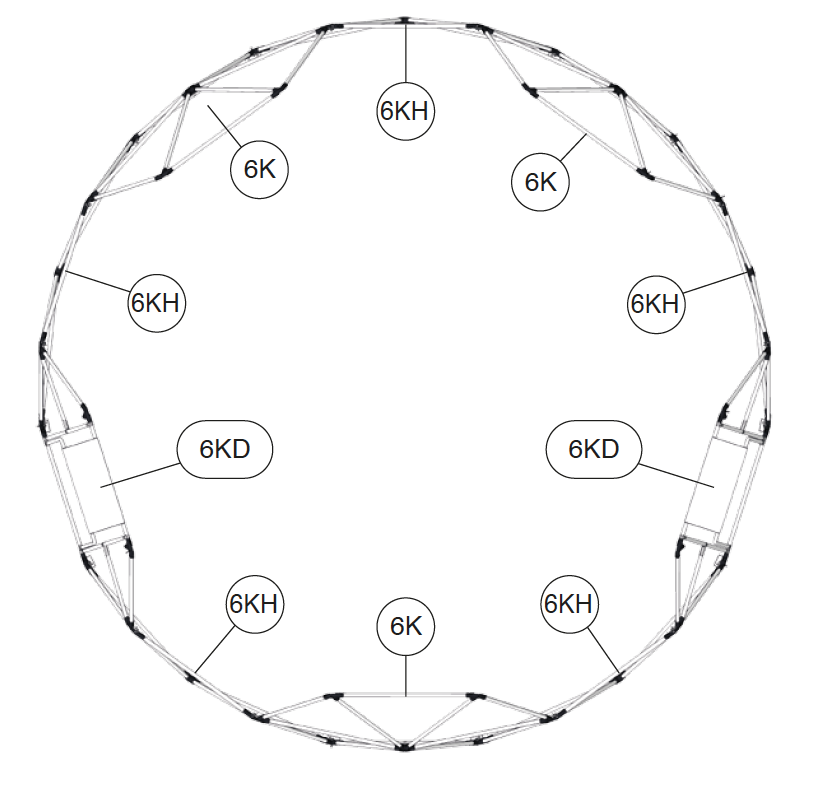
5. Mounting framework parts (part 3 of 5)
Then mount 5 pcs five sided elements (5K).
Connect the frame elements carefully down to the other elements. Make sure that the five-sided element keyways (NF) and coupling plate (KP) are joined correctly. You do not need a lot of force to assemble these.
See the drawings and element placement overviews on this page. Do not tighten the screws before the whole frame is assembled.
See page 3 and 4 for more detailed instructions for assembly of the coupling plates (KP).
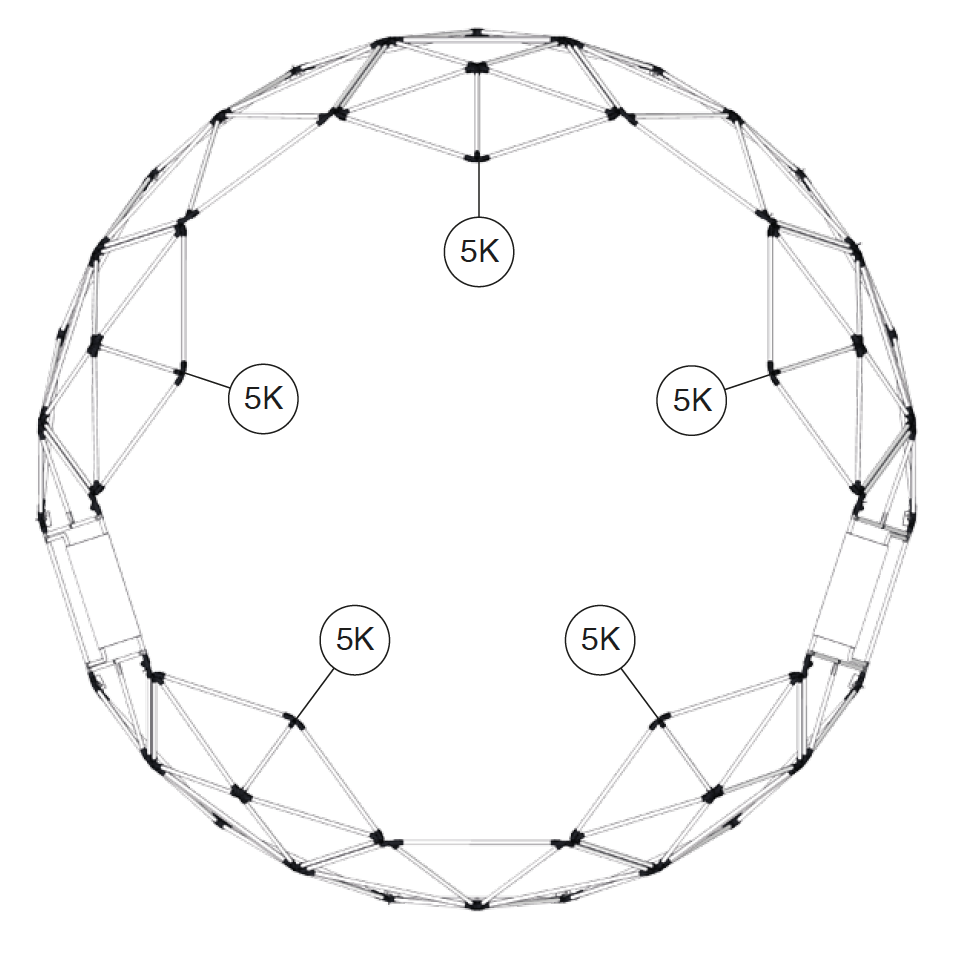
5. Mounting framework parts (part 4 of 5)
Then mount 5 pcs 6K elements.
Connect the frame elements carefully down to the other elements. Make sure that the five-sided frame element keyways (NF) and coupling plate (KP) are joined correctly. You do not need a lot of force to assemble these.
See the drawings and element placement overviews on this page. Do not tighten the screws before the whole frame is assembled.
See page 3 and 4 for more detailed instructions for assembly of the coupling plates (KP).
5. Mounting framework parts (part 5 of 5)
Then mount the final 5K element at the top.
Set the frame elements carefully down towards the other elements. Make sure that the five-sided frame keyways (NF) and coupling plate (KP) are joined correctly. You do not need a lot of force to assemble these.
See the drawings and element placement overviews on this page.
See page 3 and 4 for more detailed instructions for assembly of the coupling plates (KP).
Please note! Tighten all screws (M8-1) and (M8-2) in the whole of the frame construction.
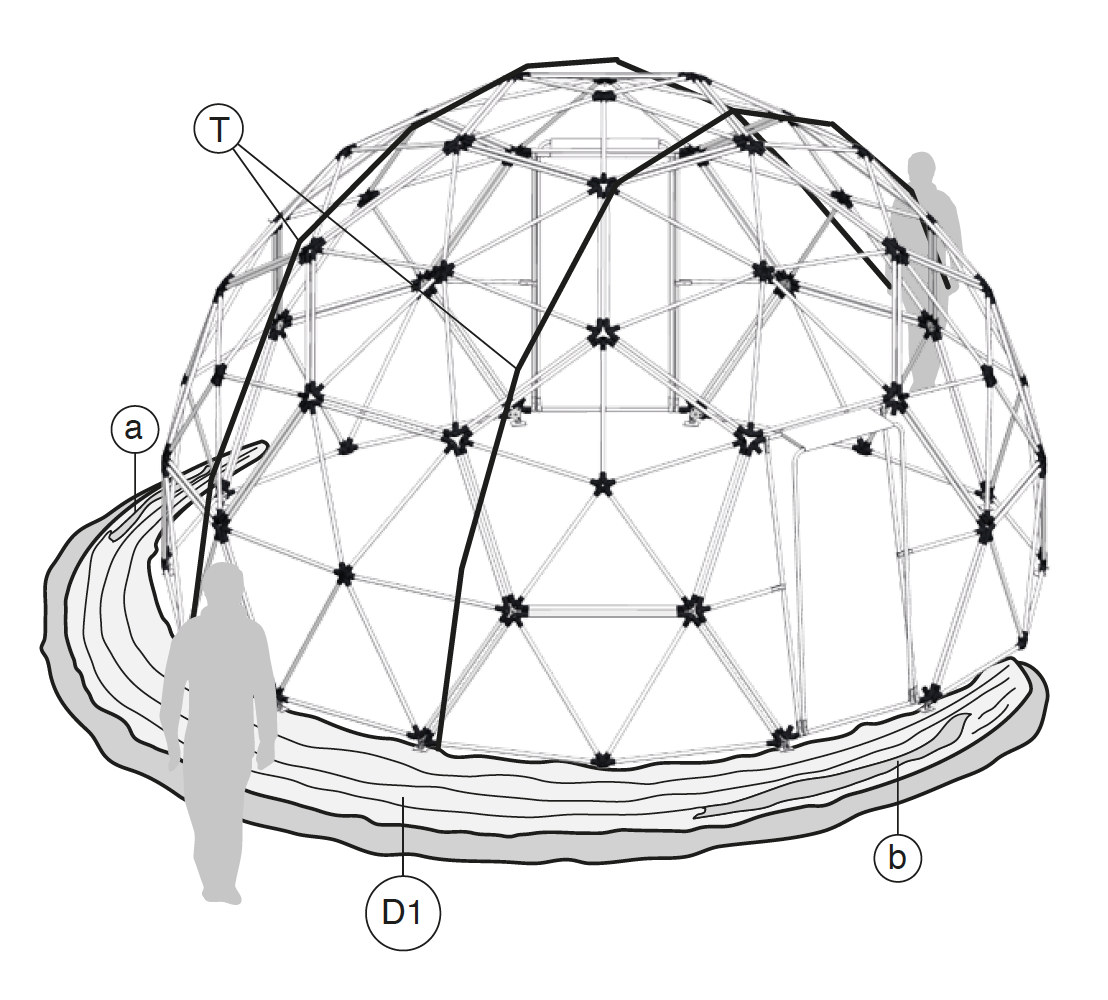
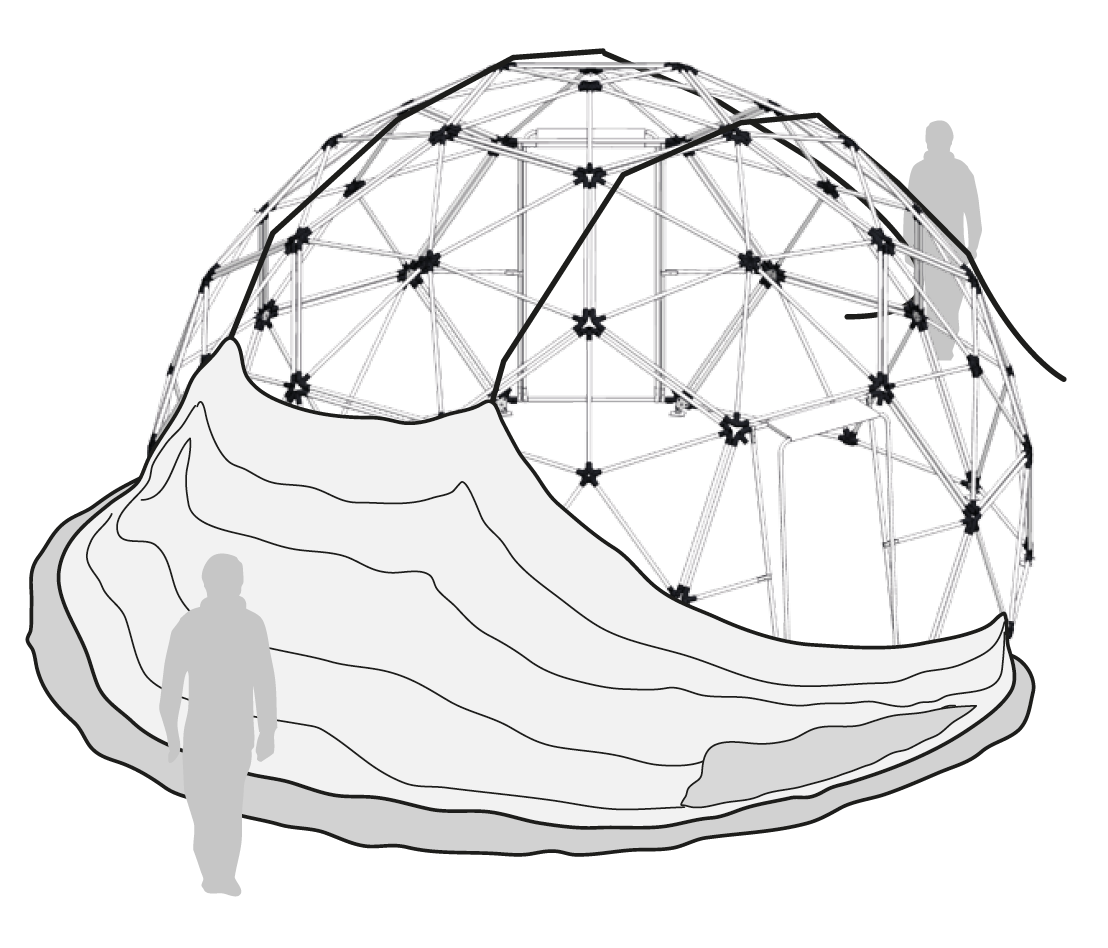
6. Mounting the outer layer and doors (part 1 of 2)
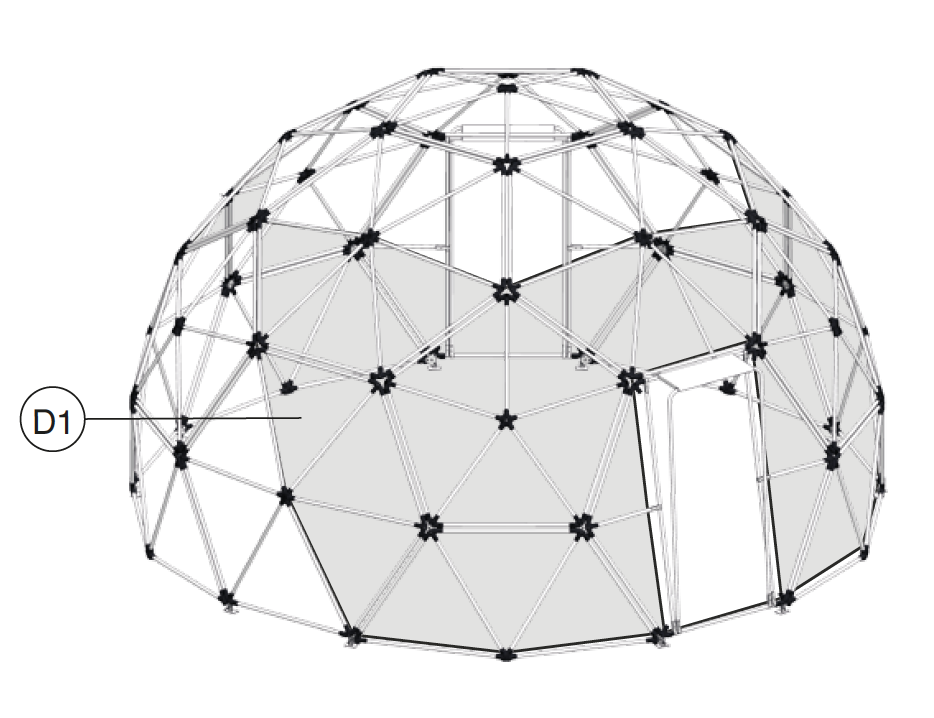
To pull the layer (D1) in the easiest way over the frame mesh, it can be beneficial to attach 2 ropes (T) to two of the lower fastening straps of the layer.
The layer for the door sections is delivered separately from the main layer, and should be fastened after the main layer has been pulled over the frame mesh.
Align the layer with the frame on one side of the dome. Make sure that door openings in the tent canvas (a&b) and the frame mesh have been aligned as correctly as possible in relation to each other.
To easily pull the layer over the frame mesh, there should be one person at either side of the dome.
Make sure that the door frames are flush with the main frame (6KD). The layer will be easier to stretch across the frame.
Then throw the ropes over the top of the frame mesh. One pulls on the ropes, and the other feeds in the layer. Make sure the layer is not caught on the frame mesh, to prevent tearing or damage during the work.
Be especially aware and careful with the windows, since these may scratch when pulled over the frame mesh.
When the layer with windows is to be fastened in severe cold (-5 deg. C), you have to be careful of and attentive with the windows. Avoid sharp folds of the windows, since this can cause damage.
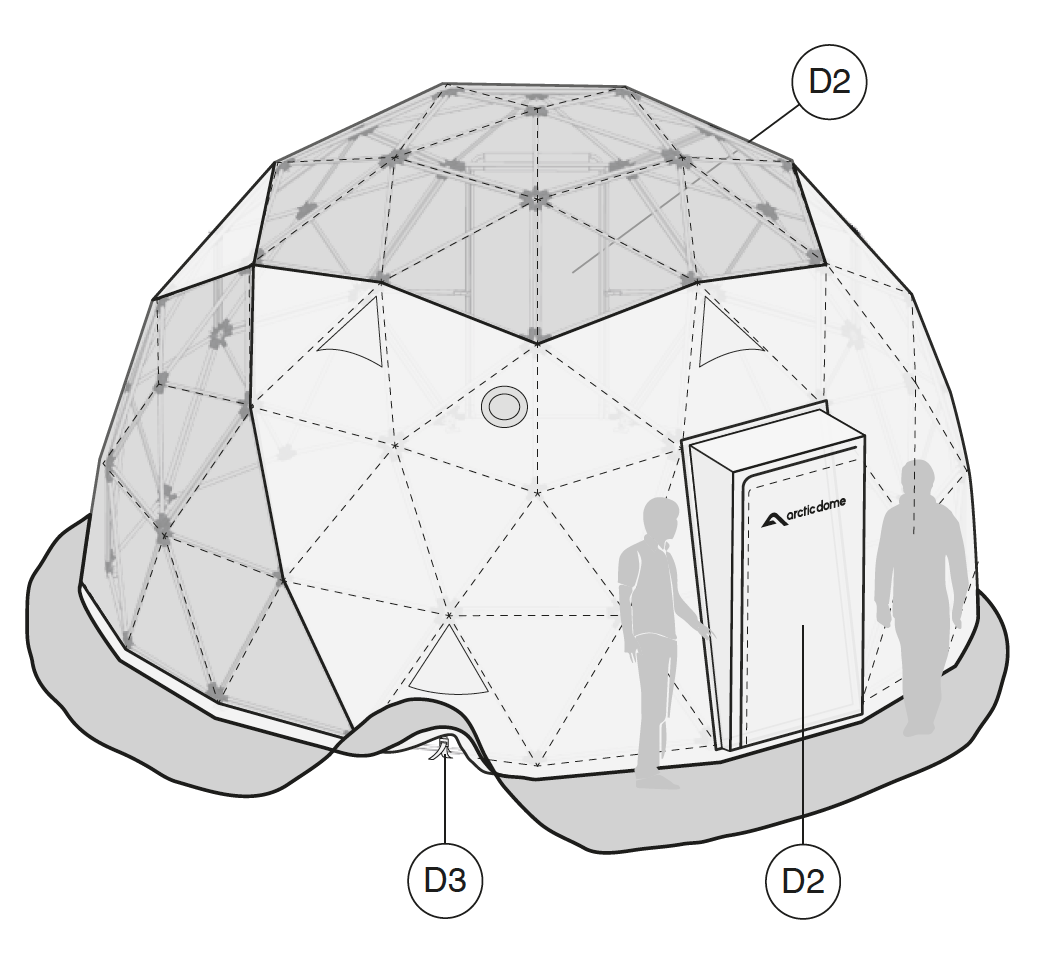
6. Mounting the outer layer and doors (part 2 of 2)
After that layer has been placed over the frame, adjust and align. Make sure that the door opening in the layer corresponds with the tubes of the frame, and has been aligned as closely as possible.
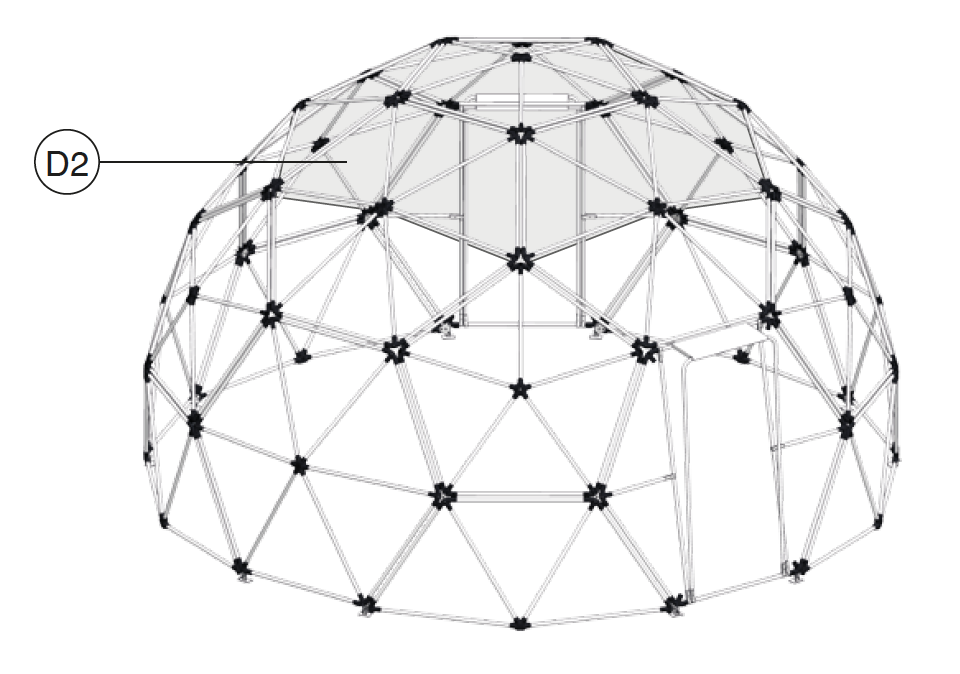
Then mount the layer (D2) for the doors. Make sure that all the hook-and-loop sections are connected correctly and evenly.
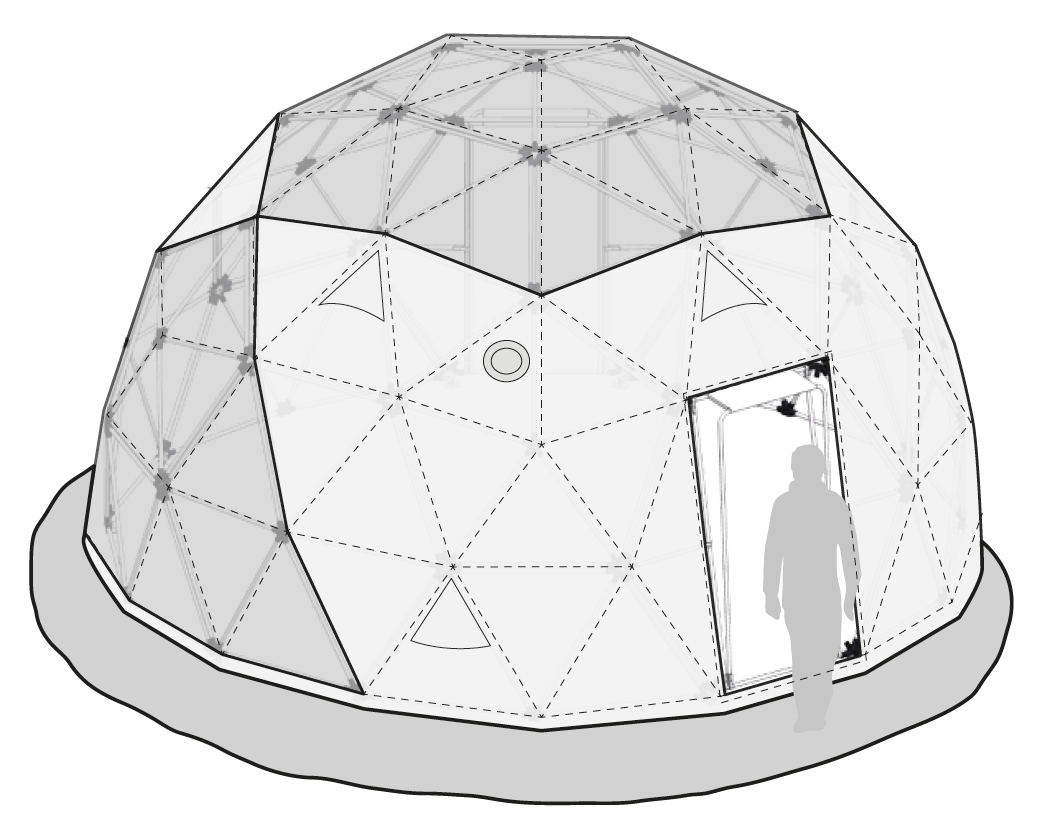
Thread all the fixing straps for the layer (D3) around the anchoring. Tighten all straps (D3) evenly around the tent, so it is placed evenly on the framework.
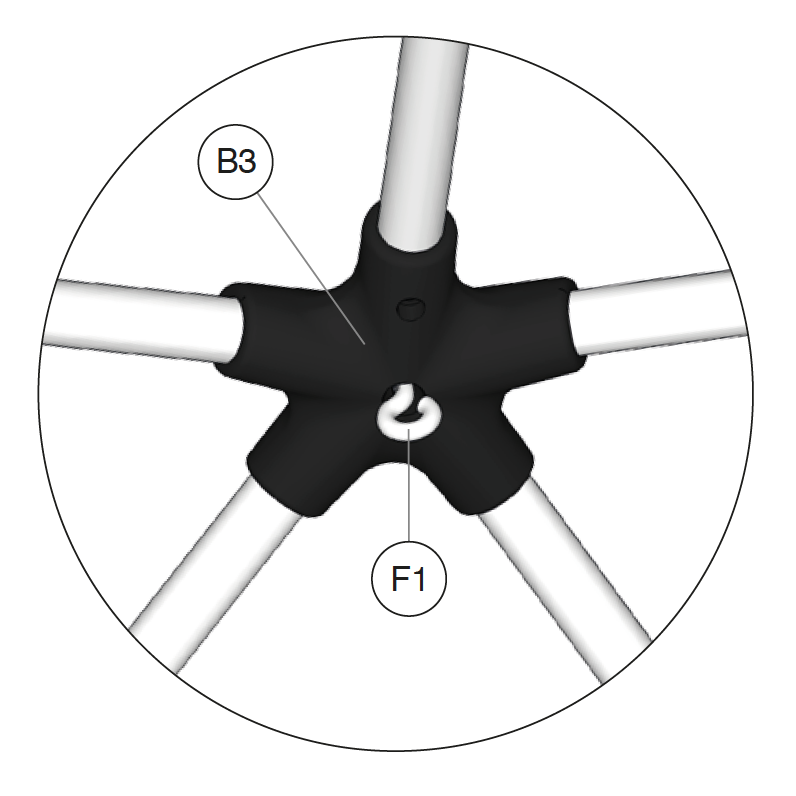
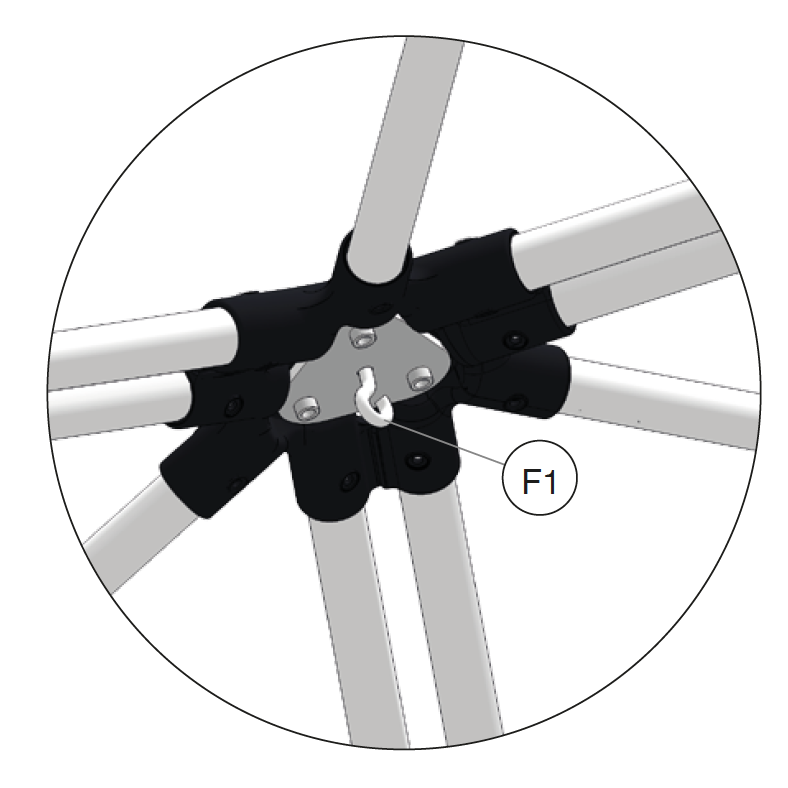
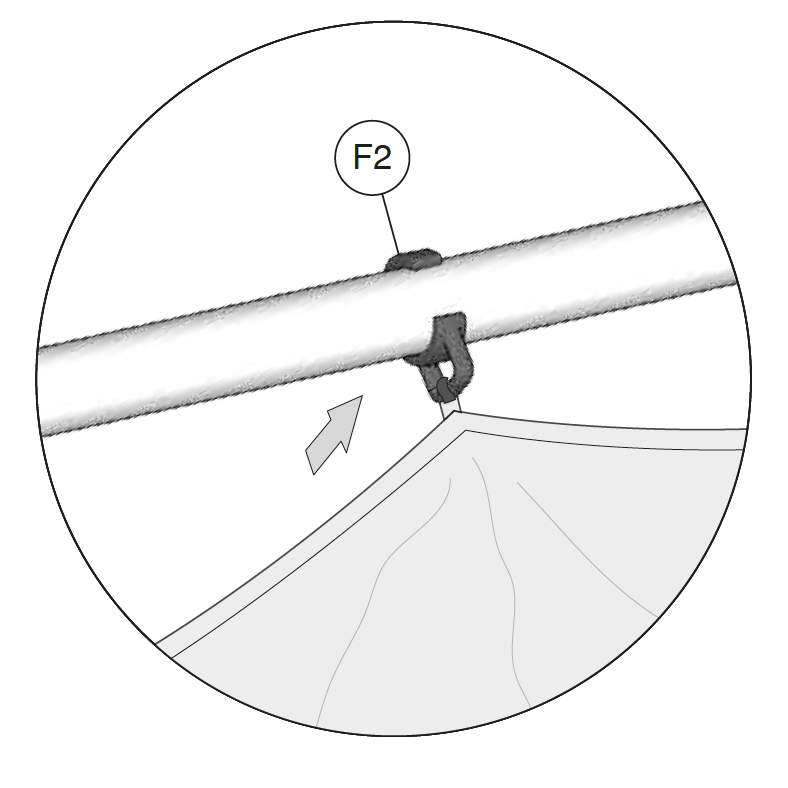
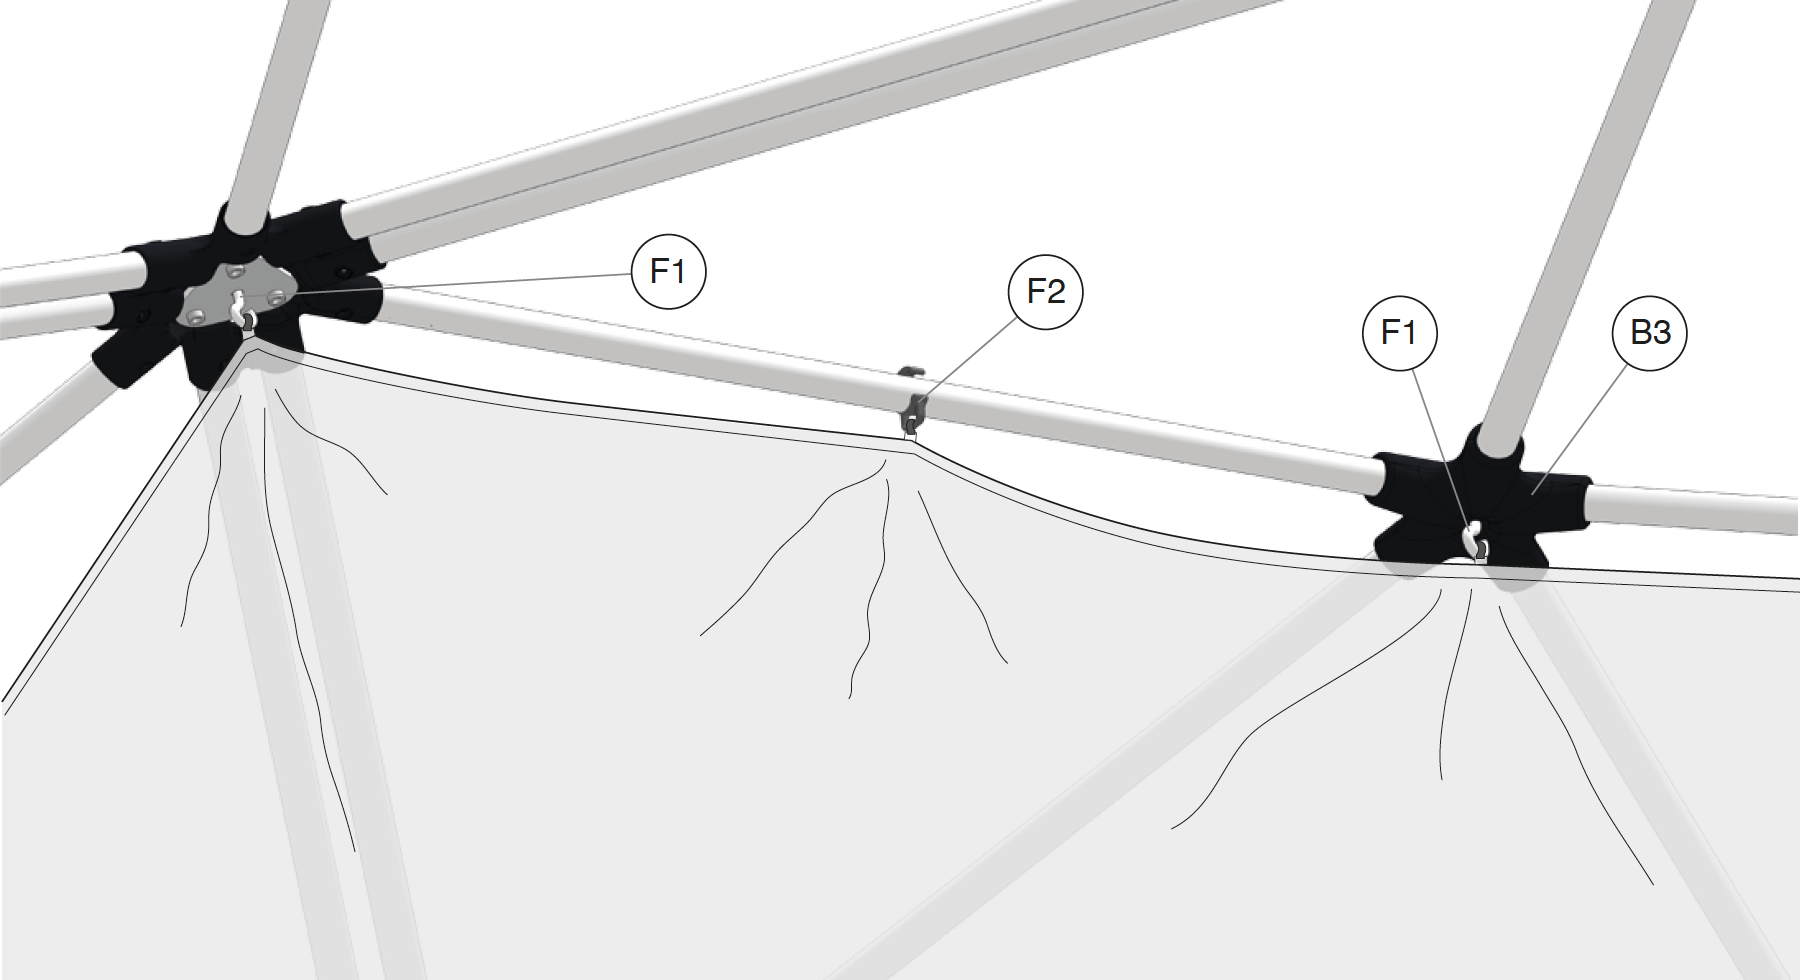
7. Mounting of fixing points for inner layer
If you are using an inner layer in the tent, separate fixing points must be employed. 2 different fixing points are included, one for use on the black plastic elements (B3) and one for use on the coupling plate (B1) and a type of fixing clips (F2) for use on the straight aluminium tubes. Mount the fixations as the figures below show.
8. Mounting the inner layer
Start by aligning the layer (D1) so that doors and windows are adjusted to the frame and the outer layer.
Start by mounting the layer on the upper point of the main window. The assemble each side, all around the dome. The layer is to be fastened to all fixings (F1) and fixing clips must be used (F2) on all the necessary straight tubes.
If so desired, assemble the layer for skylight (D2). Start by attaching the layer to the middle fixing point (B3) at the top of the dome frame.
Then attach the layer to the fixing points (B1) and attach the fixing clips K1 as needed. Attach the hook-and-loop on the layer to the edge of the main layer (D1).
Make sure that all the hook-and-loop sections are connected, and that the layer hangs correctly and evenly.
9. Use of air vents
It’s important to ensure good ventilation in the dome tent.
Air vents in the dome must be open, to avoid moisture and condensation on the inside.
There are 2 rows of air vents (LV). One row at the ceiling, and one row somewhat further down by the floor. Air vents (LV) are sown to the canvas, and can be opened from the inside of the tent. See fig. 10.
Vents (LV) are opened by rolling up the flap (K) and attaching it to the hook-and-loop section (B). If an inner layer is used, it has to be loosened to reach the air vents.
Fig. 10
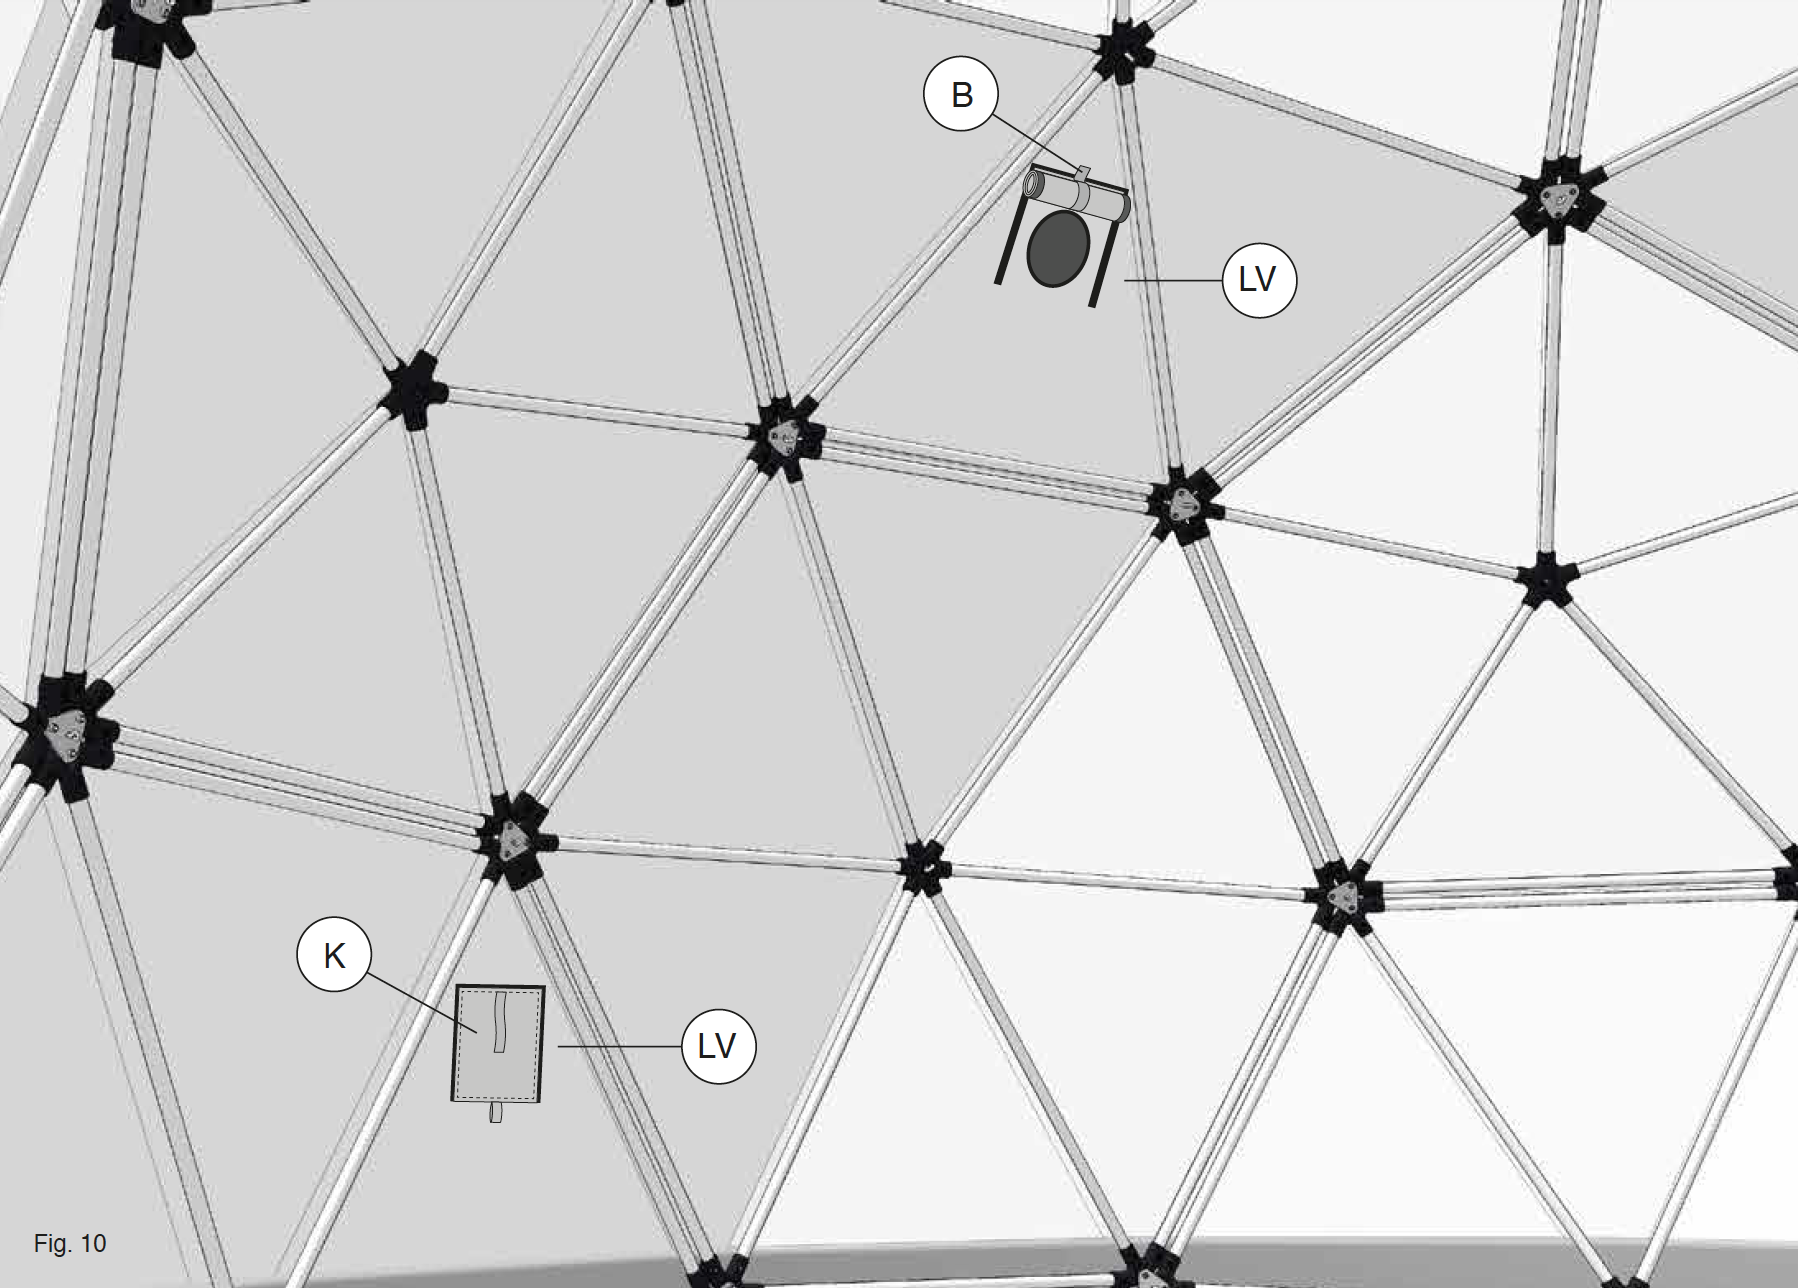
Fig. 12

10. Special considerations during use
The tent must be securely anchored in the ground, according to local wind and weather requirements. Anchoring equipment is recommended here (F) from Tentipi Norge AS. See figure 13.
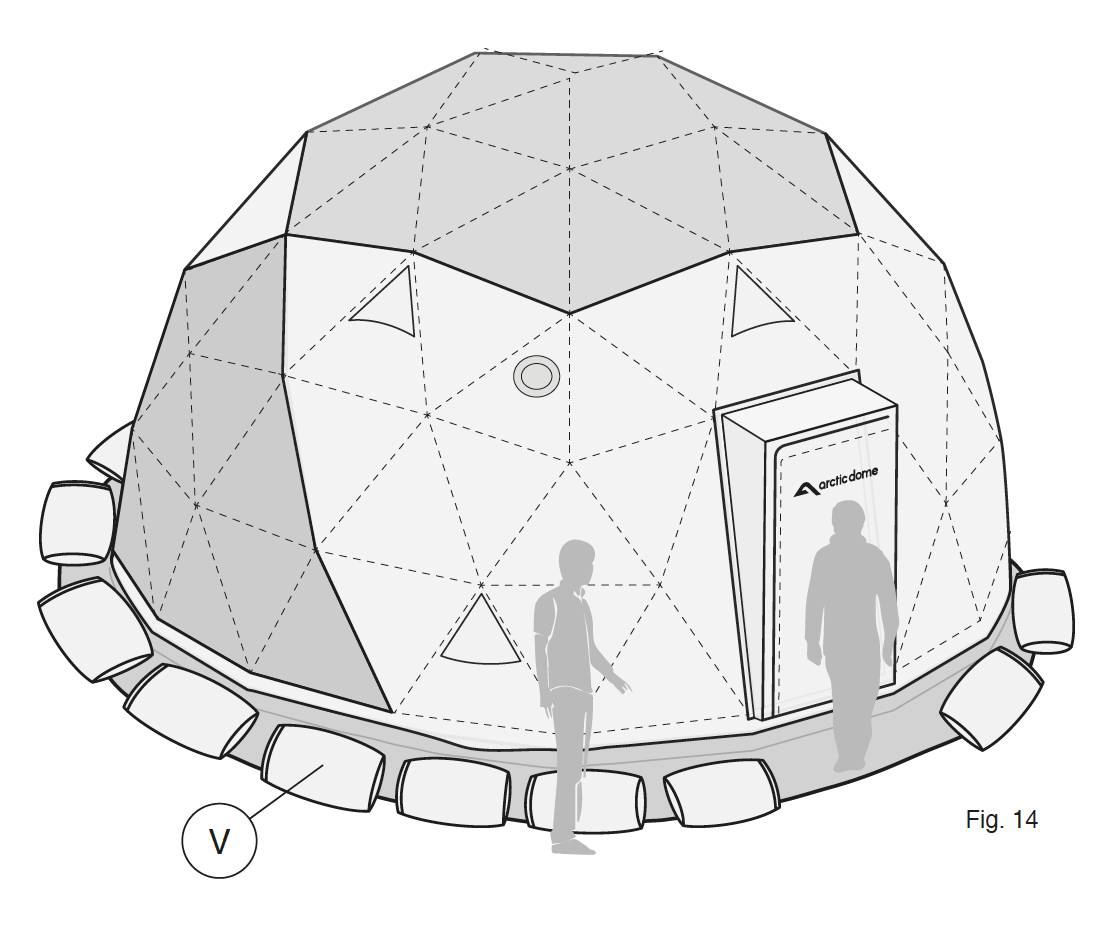
It’s important to add weight (V) (snow, rocks, sand bags, etc.) to the skirt of the tent, so that wind cannot gain hold under the tent canvas. See figure 14.
Make sure the doors are kept closed in high winds.
If you see snow fall of more than 30 cm, the snow must be cleared from the roof.
It is the customer’s responsibility to obtain the necessary permits to erect and use an Arctic Dome, according to local rules and regulations.
Fig. 13
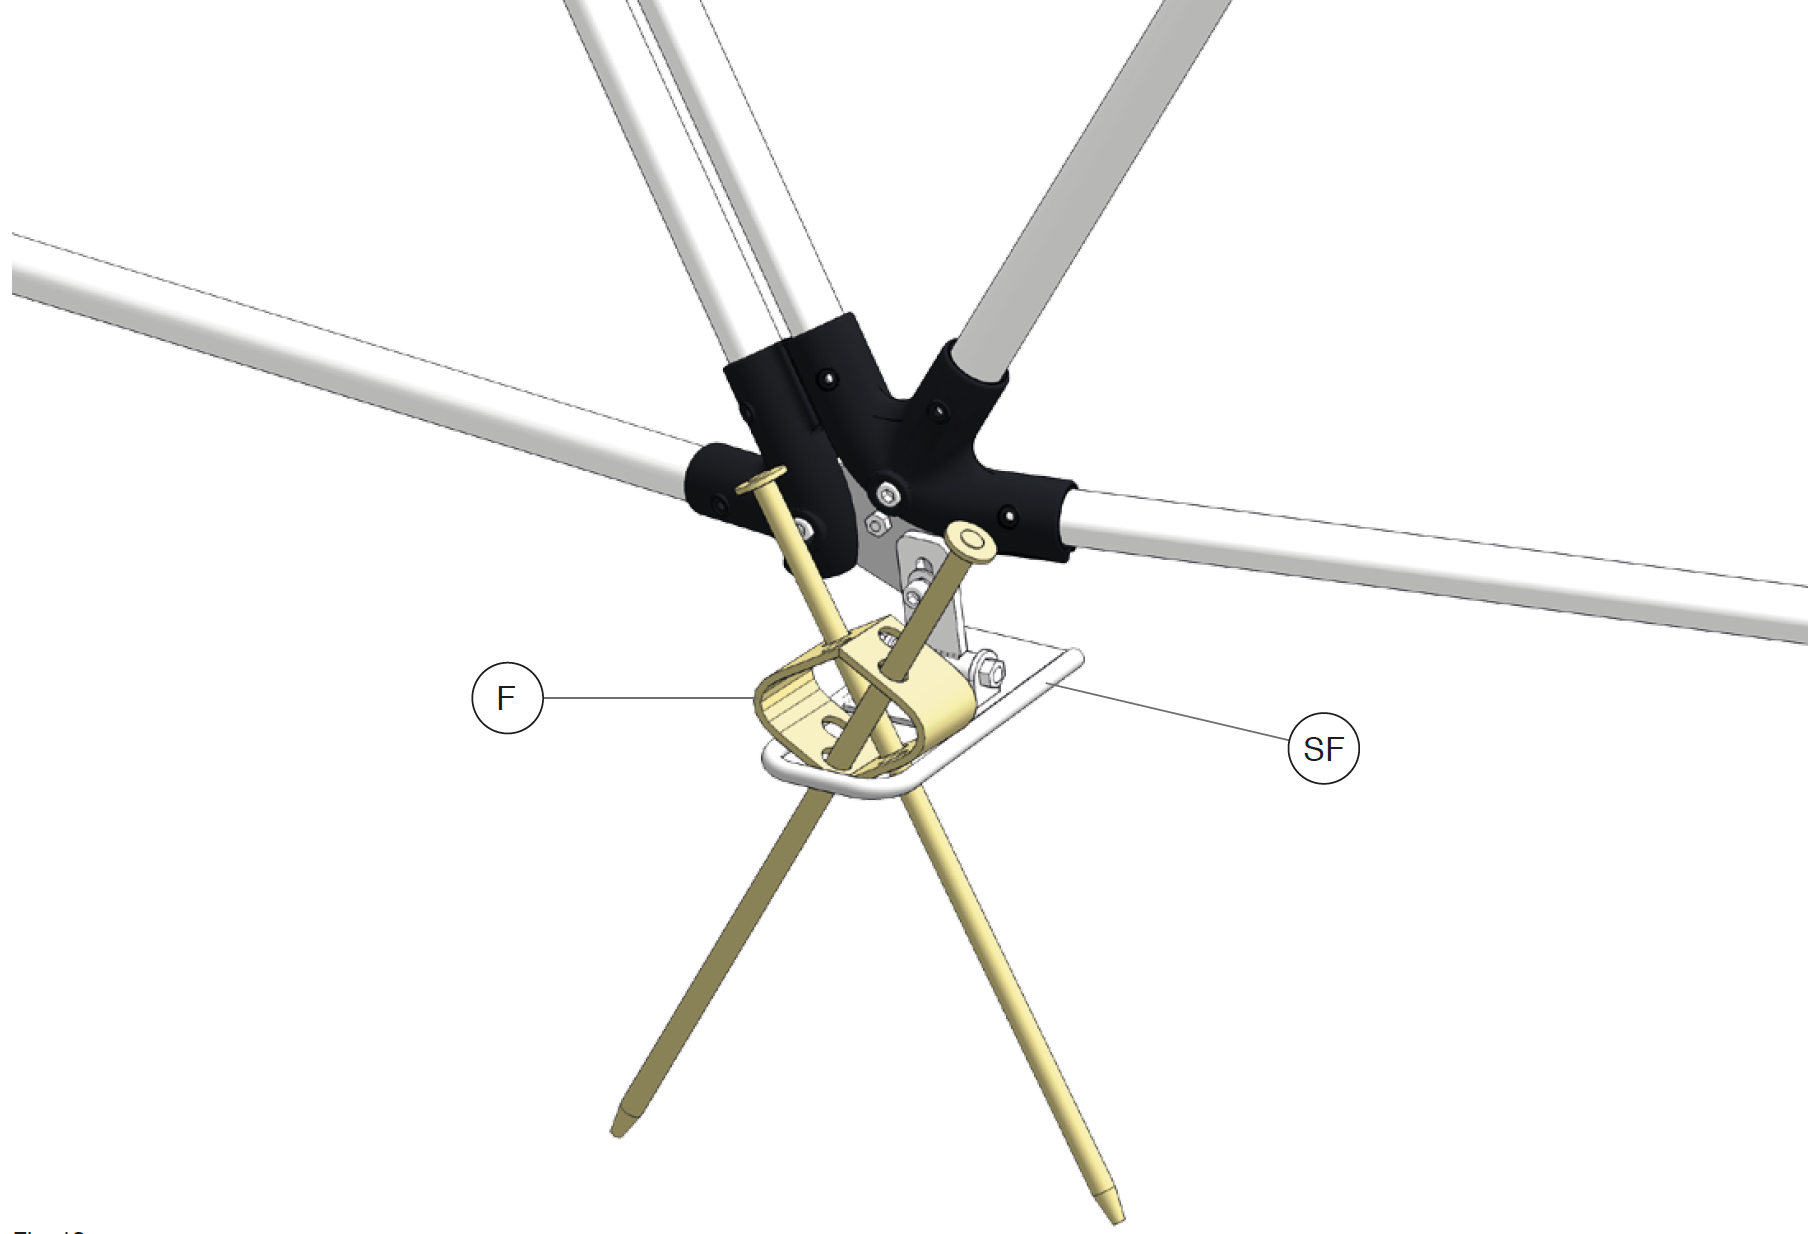
Fig. 14
11. Special for layer
Materials
Outer layer: 50/50 % polyester/cotton, impregnated, fire retardant treatment
Inner layer: 100% polyamide
Window plastic: 100 % PVC
Maintenance
The canvas can be washed with mild, soapy water, use of soap containing benzene must be avoided. Always rinse the soap out thoroughly.
An especially well-suited product for the cleaning the canvas is Acapella Cleaner. This can be ordered from Tentipi AS.
The outer layer should be impregnated after cleaning, and when otherwise needed. Do not use a squeegee on the window plastic.
Storage
The tent canvas should be stored in a dry, dark place. Be especially aware and careful with the windows, since these may scratch.
Be aware that the windows are especially fragile in harsh cold (-5 deg. C). Avoid sharp folds of the windows, since this can cause damage.
Product warranty Arctic Dome
Warranties for materials/production errors is provided according to each country’s applicable consumer legislation.
The warranty does not cover damages from accidents, improper or careless handling, normal wear or effects of V rays from the sun.